
Taking scissors to your own hair can feel terrifying, but mastering a few simple techniques makes it completely manageable. Whether you are trying to save money, avoid the salon chair, or just need a quick trim between appointments, learning how to cut your own hair is a game changer. This guide brings you 25 diy haircuts that anyone can try at home. We cover everything from basic trims for long hair to trendy shaggy layers and even short pixie maintenance. You do not need professional tools or years of training to get great results. With a little patience, sharp shears, and the right guidance, you can freshen up your look perfectly. Grab your comb, section your hair, and get ready to transform your style.

1. Diy Blunt Cut Bob

Nothing feels quite as sharp and clean as a perfectly even bob. The diy blunt cut bob works best on straight or slightly wavy hair, giving you that chic, professional look without the salon price tag. To achieve this, start with freshly washed and completely damp hair. Comb it straight down and pull it into a low ponytail at the nape of your neck. Secure it with a clear elastic, then slide another elastic down to your desired length. Hold the ponytail firmly below the second elastic and make one straight, clean cut across. Let your hair down, comb it smooth, and check for any uneven pieces. You will be left with a striking, one-length bob.
2. Diy Curtain Bangs Long Hair

Are you tired of your long hair falling flat against your face? Diy curtain bangs long hair instantly softens your features and adds beautiful movement. Start by parting your hair down the middle. Take a triangular section from the front hairline right to the crown. Lightly mist the section with water so it is damp but not dripping. Pull the triangle straight down over your nose and hold the hair between two fingers. Point your scissors upward and cut vertically into the ends. This creates a soft, feathered edge rather than a harsh line. The center should hit around your cheekbones, gradually getting longer as it blends into the rest of your hair. Style them with a round brush for that perfect sweeping effect.
3. Diy Buzz Cut Women

Embracing a bold look has never been this liberating. The diy buzz cut women offers an incredibly low-maintenance style that radiates confidence. You only need a reliable set of hair clippers to get started. Decide on your guard size, keeping in mind that a lower number means a shorter cut. If you are unsure, always start with a longer guard because you can always go shorter. Stand in front of a mirror and simply run the clippers evenly all over your head, moving against the direction your hair grows. Use a handheld mirror to check the back and sides for any missed spots. Finish by using a trimmer to clean up the edges around your ears and neckline for a polished finish.
4. Diy Layered Long Hair

Adding layers to lengthy locks removes bulk and creates gorgeous bounce. The diy layered long hair technique relies on the classic ponytail method. Brush your freshly dampened hair and pull it up into a high ponytail right at the top of your forehead, similar to a unicorn horn. Secure it tightly with an elastic. Smooth the ponytail out and decide exactly how much length you want to remove. Hold the ends firmly and make a horizontal cut straight across. Once you take the ponytail down, you will notice soft, cascading layers framing your face. This simple trick removes the guesswork from layering and gives you a beautifully blended cut that makes long hair look voluminous and healthy again.
5. Diy Shag Haircut

Channeling that effortless rock-and-roll vibe is easier than you think. The diy shag haircut brings heavy texture, volume, and a cool lived-in feel to medium or long hair. Begin with dry hair so you can see exactly how the hair naturally falls. Part your hair down the middle and gather it into a low ponytail at the nape of your neck. Twist the ponytail tightly until it coils upon itself. Hold the ends and snip into them deeply with your scissors, pointing them vertically to create dramatic notches. Unravel the twist, shake your head, and you will find choppy, textured layers throughout. This heavily layered look thrives on messiness, so do not worry about making it too perfect.
6. Diy Mens Fade Haircut

Mastering the clippers at home takes patience, but the diy mens fade haircut is highly rewarding. You will need clippers with multiple guard sizes, a comb, and blending shears. Start with the longest guard at the top and work your way down. Use a shorter guard for the sides and back, cutting upward with a rocking motion to create a seamless transition. The key to a good fade is the blend. Switch to an even shorter guard for the lowest section near the ears and neck. Use the clipper-over-comb technique to smooth out any harsh lines between the different lengths. Finish the top with scissors to your preferred length, ensuring the whole cut looks seamlessly connected and sharp.
7. Diy Pixie Cut Trim

Keeping a short crop fresh requires regular maintenance. The diy pixie cut trim keeps your style from growing out awkwardly between salon visits. Work with dry hair so you can judge the true length accurately. Use a spray bottle to lightly mist any areas that are too fluffy. Comb the top section forward and snip the ends using point-cutting, holding your scissors vertically to avoid blunt lines. For the sides and back, use your fingers as a guide to pinch small sections and trim the excess. Be very conservative, taking off only a tiny bit at a time. Because pixie cuts are so short, even a small mistake is noticeable. Keep the perimeter soft and textured for a modern vibe.
8. Diy Shoulder Length Layered Cut

Craving volume around your face without losing overall length? The diy shoulder length layered cut gives you that bouncy blowout look. Pull clean, damp hair into a high ponytail at the very top of your head. Smooth out any bumps with a comb. Slide an elastic down to the tips, leaving the amount you want to cut exposed. Cut straight across the ends. When you remove the ponytail, the hair that was at the top becomes the shorter face-framing layers, while the bottom remains long. This clever trick provides beautiful, soft layers that hit right at the shoulders and collarbone. It instantly breathes life into flat, heavy hair, making your daily styling much easier and full of movement.
9. Diy V Cut Long Hair

Love the look of long hair but want more drama at the back? The diy v cut long hair creates a stunning angled shape that looks incredible from behind. Brush your damp hair straight back and gather it into a low ponytail at the center of the nape. Split the ponytail into two equal halves. Pull one half down tightly and cut the desired length at an angle going upward toward the center. Repeat the exact same angled cut on the other half. When you release the ponytail, the hair will form a beautiful V-shape, shorter at the sides and longest right down the middle. This preserves your length while adding gorgeous architecture to your long locks.
10. Diy Micro Bangs

Ready for a seriously striking change? The diy micro bangs offer an edgy, high-fashion look that completely transforms your face. Only attempt this on dry hair, as wet hair springs up significantly once it dries. Section off a small triangle of hair right at the front hairline, keeping it narrow so you do not take too much from the sides. Comb this small section straight down over your forehead. Hold your scissors horizontally and cut straight across, stopping about an inch or two above your eyebrows. Use your scissors to point vertically into the very edges to soften the line slightly. This bold cut draws immediate attention to your eyes and pairs beautifully with longer hair or a short pixie.
11. Diy Mens Buzz Cut

Sometimes you just need to start fresh. The diy mens buzz cut is the ultimate zero-maintenance style that feels incredibly cool in the summer. Grab your clippers and pick the guard size that matches your desired length. If you want the sides shorter than the top, select two different guards. Start from the front and move the clippers toward the back, going against the grain of the hair. Overlap your passes slightly so no patches are left behind. Do the same on the sides, moving from the bottom of the sideburns up. Use a mirror to double-check the back. Without any complicated fading, this uniform length cut takes just a few minutes and looks flawlessly clean every time.
12. Diy Face Framing Layers

Want to highlight your cheekbones without a full haircut? The diy face framing layers technique gently blends into your existing length for a subtle upgrade. Part your damp hair down the middle and pull the rest back. Grab a one-inch section of hair from the very front on each side of your face. Comb these two sections forward. Pinch the hair between your index and middle finger, pulling it down tight. Slide your fingers down to your desired length, leaving a little extra to account for shrinkage. Cut the hair below your fingers at a slight diagonal angle moving down toward your chin. This creates beautiful sweeping pieces that softly hug your face and add instant brightness.
13. Diy Curly Girl Method Cut

Cutting curly hair requires a totally different approach than straight hair. The diy curly girl method cut relies on working with your natural texture to prevent the dreaded triangle shape. Start with completely dry, fully styled curls. Take small sections of hair, one curl at a time, and gently stretch the curl down to see its natural spring. Trim only the very ends, cutting at an angle or directly across the curl cylinder. By cutting each curl individually, you respect its unique pattern and avoid disrupting the clumping process. This method ensures your curls bounce perfectly on their own without floating away. It is a slow process, but the resulting shape is incredibly natural and defined.
14. Diy Lob Haircut

The long bob remains one of the most universally flattering cuts. The diy lob haircut hits right at the collarbone and looks amazing on almost everyone. Brush your damp hair straight back and part it down the middle. Bring both sides to the front over your shoulders. Comb the right side smooth and pull it taut. Cut straight across at the collarbone, ensuring the line is perfectly horizontal. Repeat on the left side, using the first side as your guide. Because the back is slightly longer than the front in a standard lob, you might need to gently angle the back. This simple, sleek cut is incredibly chic, easy to style, and perfect for everyday wear.
15. Diy Wispy Bangs

Heavy bangs can feel overwhelming, but a lighter option adds just the right touch of softness. The diy wispy bangs give you a feathery, airy fringe that blends beautifully into any hair length. Section off a thin piece of hair at the front hairline, about an inch wide. Leave the rest of your hair secured out of the way. Mist the section lightly with water. Pull the hair straight down and hold it between your fingers. Point your scissors upward and snip vertically into the hair, cutting small notches rather than a straight line. Keep the length right around your eyebrows. This vertical cutting technique ensures the bangs remain light, piecey, and easy to sweep to the side.
16. Diy Mens Taper Haircut

Leaving a little length on top creates a versatile style. The diy mens taper haircut keeps the top longer while gradually fading the sides and back down to the skin. Use a longer guard on the clippers for the top half of the sides, and a shorter guard for the bottom half. Use a flicking motion as you reach the upper sections to create a smooth transition. The most important step is blending the line where the two different guard lengths meet. Use a comb to lift the hair at that transition point and carefully clipper over the comb to remove the weight. This keeps the top full and stylable while maintaining a clean, tight look around the ears.
17. Diy U Shaped Haircut

Long hair looks incredibly healthy when the ends form a perfect U. The diy u shaped haircut removes the stringy bottom pieces while keeping thick, beautiful length throughout. Have a friend help you section the back, or use two mirrors. Brush all your damp hair straight back. Gather it at the nape and secure it with a clear elastic. Pull the elastic down slightly past where you want to cut. Trim straight across the bottom. Then, gently slice upward into the outer edges on both sides to create a soft, rounded U curve. This shape carries more weight at the bottom than a V-cut, making it ideal for anyone wanting thick, lush ends that look full and vibrant.
18. Diy Feathered Layers

Bring back that iconic seventies volume with a modern twist. The diy feathered layers add incredible bounce and movement, especially for medium to thick hair. The trick to feathering is the angle of your cut. Pull your damp hair into a high ponytail at the crown. Slide the elastic down and cut the ends straight across. When you take the hair down, you will have heavy layers. To get that feathered flip, take small front sections of the cut layers, hold them up vertically, and point your scissors downward into the ends. This heavily textures the tips, allowing them to sweep away from your face beautifully. Blow-dry with a round brush to enhance the sweeping, feathered effect.
19. Diy Long Bob With Side Bangs

Combining a collarbone cut with a sweeping fringe creates a stunning, effortless style. The diy long bob with side bangs softens strong jawlines and adds immediate sophistication. Cut the base of your lob first by bringing damp hair to the front and trimming straight across at the collarbone. Next, take a triangular section at the front hairline for your side bang. Comb it over to one side and decide where you want the shortest piece to hit, usually around the cheekbone. Cut the bang at a steep diagonal, making the shortest part hit the cheek and the longest piece blending into the lob. Style by sweeping the bang to the side and tucking the opposite side behind your ear.
20. Diy Mens Textured Fringe Cut

The modern bowl cut has evolved into a highly requested look. The diy mens textured fringe cut keeps the sides tight and the top long and choppy. Use clippers with a short guard to buzz the sides and back, leaving the top completely untouched. Dampen the top section and comb it forward over the forehead. Pinch small sections of the front fringe between your fingers and point your scissors directly upward into the ends. This creates a choppy, heavily textured look rather than a blunt bowl shape. The textured fringe should hit right at the eyebrows. Use a matte styling product to push the hair forward and separate the pieces for that effortlessly messy, trendy aesthetic.
21. Diy Short Layered Bob
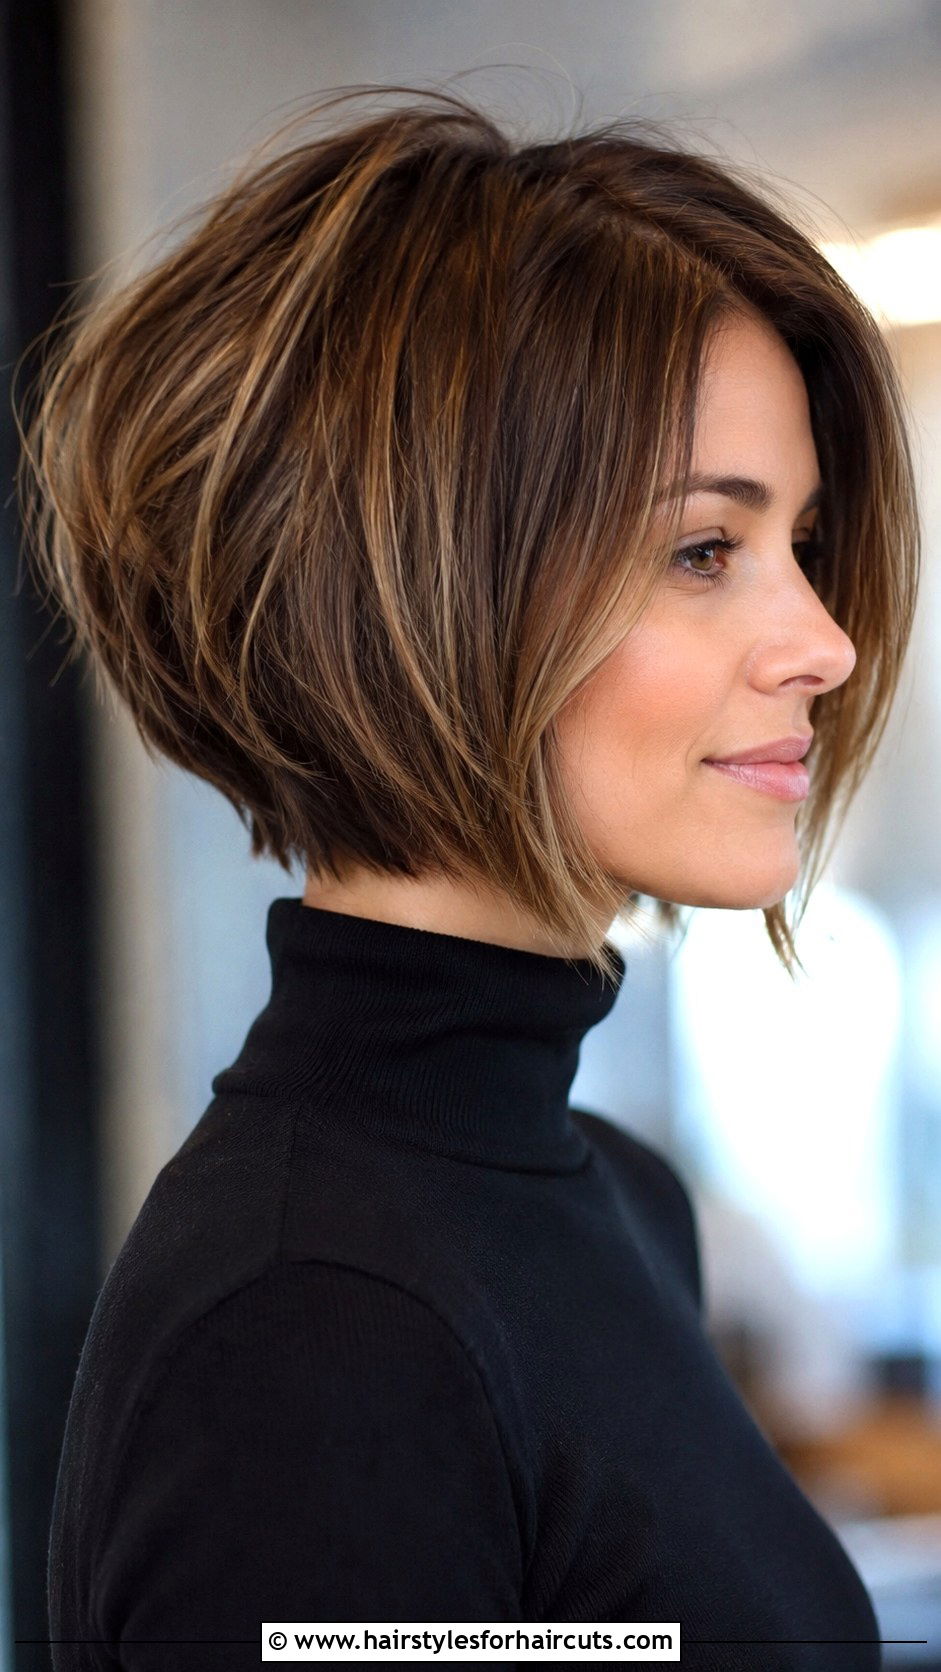
Want major volume without the weight? The diy short layered bob stacks the layers in the back for a lifted, rounded shape. Start by cutting a baseline for your bob at the nape of your neck. Work your way up the back of your head, taking horizontal sections. With each higher section, pull the hair down and cut it slightly shorter than the section below it. This builds stacking weight and curve. Around the front, cut the sides at an angle so they are slightly longer than the back. Add a few short layers on top by pulling hair straight up and snipping the ends. The result is a bouncy, chin-length cut packed with energy and movement.
22. Diy Twist And Cut Layers

This method is perfect for anyone nervous about cutting straight lines. The diy twist and cut layers creates soft, natural-looking layers that blend flawlessly. Take a small section of damp hair, about two inches wide, from the front of your face. Twist the section tightly all the way down to the ends. The hair that sticks out of the twist is what you will cut. Simply snip off the hair that pokes out of the twisted rope. Move around your head, taking similar sections, twisting them, and cutting the excess. This technique naturally creates shorter layers near the top and longer ones at the bottom. It is incredibly forgiving and leaves you with seamless, textured movement everywhere.
23. Diy Wavy Lob Trim

Keeping beachy waves healthy means trimming away split ends regularly. The diy wavy lob trim maintains your casual collarbone cut without ruining the natural wave pattern. Work with dry, styled hair so you can see exactly how the waves fall. Take one wave at a time, identify where the split ends start, and cut just above the damage. Follow the natural curve of the wave, cutting at a slight angle rather than straight across. This preserves the S-shape of your curls and prevents them from falling flat. By trimming each wave individually, you maintain the organic, tousled look that makes the wavy lob so popular. Your hair will instantly look thicker, shinier, and full of life.
24. Diy Mens Crew Cut

Sharp, athletic, and timeless, this style never goes out of fashion. The diy mens crew cut features a short, tapered back and sides with a slightly longer, flat top. You will need three different clipper guards. Use the longest guard for the top, running the clippers front to back. Switch to a medium guard for the upper sides and back, blending into the top with a rocking motion. Use the shortest guard for the lower sides and around the ears. The distinct difference in length gives the crew cut its signature upright appearance. Finally, take a comb and scissors to the very front top section, trimming any wild hairs so the top lies flat and neat.
25. Diy Wolf Cut

Embrace your wild side with the trendiest shaggy style of the year. The diy wolf cut combines heavy face-framing layers with serious volume at the crown. The easiest way to achieve this is the ponytail method. Lean your head forward and gather all your damp hair into a high, tight ponytail at the very front of your head. Hold the ponytail straight up and cut horizontally across the ends, removing as much length as you desire. When you flip your head back, you will have fierce, short layers around your face and longer pieces underneath. Use thinning shears on the ends to remove bulk and add that perfectly messy, rockstar texture that defines the trendy wolf cut.
Conclusion:
Giving yourself a haircut at home does not have to be a disaster waiting to happen. With these 25 diy haircuts, you have all the tools and techniques needed to maintain, trim, or completely transform your look. The most important rules are to start with sharp shears, work slowly, and always cut less than you think you should. You can always take more off, but you cannot put it back. Whether you are maintaining a curly girl shape, giving yourself a chic lob, or buzzing it all off for a fresh start, confidence is key. Practice makes perfect, so do not get discouraged if your first attempt is slightly imperfect. Grab your scissors, trust the process, and enjoy your fresh new style.

Leave a Reply