
Getting ready should not feel like a stressful chore. If you are looking for quick and gorgeous ways to style your hair, you are in the right place. We have gathered 25 hairstyles easy step by step so you can achieve salon-looking results right at home. Whether you are heading to the office, running errands, or just wanting a fresh everyday look, these tutorials are incredibly simple to follow. You do not need professional skills or expensive tools to master these stunning hairdos. From chic buns to beautiful braids, each guide breaks down the process into clear, manageable steps. Grab your brush and some bobby pins, and let us transform your morning routine with these effortless yet beautiful hairstyles that anyone can do.

1. Easy Messy Bun Hairstyle Step By Step

Ever had one of those mornings where your hair just will not cooperate? The messy bun is your ultimate savior. Start by flipping your head upside down and gathering all your hair at the crown. Secure it with an elastic, but on the final loop, only pull the hair halfway through to create a looped ponytail. Take the remaining loose ends and wrap them loosely around the base of the elastic. Pin the ends securely with bobby pins. Gently pull and tug at the looped section to create volume and that perfectly undone texture. Pull out a few face-framing pieces to soften the look. This effortless style takes less than two minutes and looks incredibly chic for any casual outing.
2. Step By Step Low Chignon Hairstyle

Craving a look that screams quiet elegance without the extra effort? The low chignon is a timeless choice. Begin by applying a light-hold gel to smooth out any flyaways. Gather your hair at the nape of your neck, positioning it slightly to one side. Secure it with a clear elastic. Create a small opening right above the elastic and flip the ponytail up and through the gap. This creates a beautiful twisted effect. Next, take the remaining length of the ponytail and wrap it around the elastic to form a small, neat bun. Secure the ends with a few bobby pins tucked underneath. This sleek style is perfect for professional settings or formal events.
3. Easy French Braid Hairstyle Step By Step

Want a classic style that keeps your hair secure all day long? The French braid is a fantastic option. Start at the top of your head and gather a small section of hair near your forehead. Divide this into three equal pieces. Begin a standard braid by crossing the right section over the middle, then the left over the new middle. As you continue, add small pieces of hair from the sides into the braid before crossing them over. Keep the tension firm as you work your way down the back of your head. Once you reach the nape, finish with a regular three-strand braid and secure with an elastic. This look is great for workouts or casual days.
4. Step By Step Dutch Braid Hairstyle

Looking for a braid that really pops and stands out? The Dutch braid is essentially a reverse French braid. Take a section of hair at the top of your crown and split it into three parts. Instead of crossing the strands over the middle, cross them under. This pushes the braid outward, creating a bold 3D effect. Add hair from the sides just like you would with a French braid, always crossing under. Continue this technique all the way down the back of your head. Once you run out of hair to add, simply braid the rest regularly and tie it off. Gently pull at the edges of the braid to make it look thicker and more voluminous.
5. Easy Half Up Half Down Hairstyle Step By Step

Need a quick fix that looks romantic and effortlessly beautiful? The half up half down style is a go-to. Using your thumbs, separate the top section of your hair from ear to ear. Brush this top portion smooth and gather it at the back of your head. Secure it with a clear elastic or a decorative clip. To add a bit of flair, create a small hole above the elastic and flip the ponytail through it once. This gives a nice twisted detail. You can also gently tug at the top crown to add some extra volume. Leave the bottom half of your hair flowing naturally or curl it for a softer, more romantic finish.
6. Step By Step Fishtail Braid Hairstyle

Ever wondered how to achieve that intricate-looking braid without the hassle? The fishtail braid looks complex but is surprisingly simple. Gather all your hair to one side and split it into just two equal sections. Take a tiny strand of hair from the outside of the left section and cross it over to the right section. Then, take a small strand from the outside of the right section and cross it over to the left. Keep repeating this process, alternating sides, all the way down. The smaller the pieces you take, the more detailed the braid will look. Tie it off at the bottom and gently pancake the sides to make it look thick and effortlessly textured.
7. Easy Space Buns Hairstyle Step By Step

Ready to embrace a fun and playful vibe? Space buns are energetic and easy to create. Part your hair straight down the middle from your forehead all the way to the nape, creating two equal pigtails. Secure each pigtail with an elastic at the desired height on your head. Take one pigtail and twist it around its base to form a bun, securing it with bobby pins or a second elastic. Repeat the exact same process on the other side. For a messier, festival-ready look, gently pull at the buns to loosen them and let a few strands fall free. This double bun style is perfect for concerts or just adding joy to your weekend outfit.
8. Step By Step Twist Crown Hairstyle

Dreaming of a soft, bohemian look without intricate braiding skills? The twist crown is your best friend. Take a small section of hair near your left temple and split it into two pieces. Twist them around each other, adding a little more hair from the hairline as you go, working your way across the back of your head. Pin this twist temporarily. Repeat the same twisting process on the right side, moving toward the back. When the two twists meet at the back, tie them together with a small clear elastic. Remove the temporary pins and gently pull the twists apart for a thicker, more romantic appearance. This gives a beautiful halo effect.
9. Easy Claw Clip Updo Hairstyle Step By Step
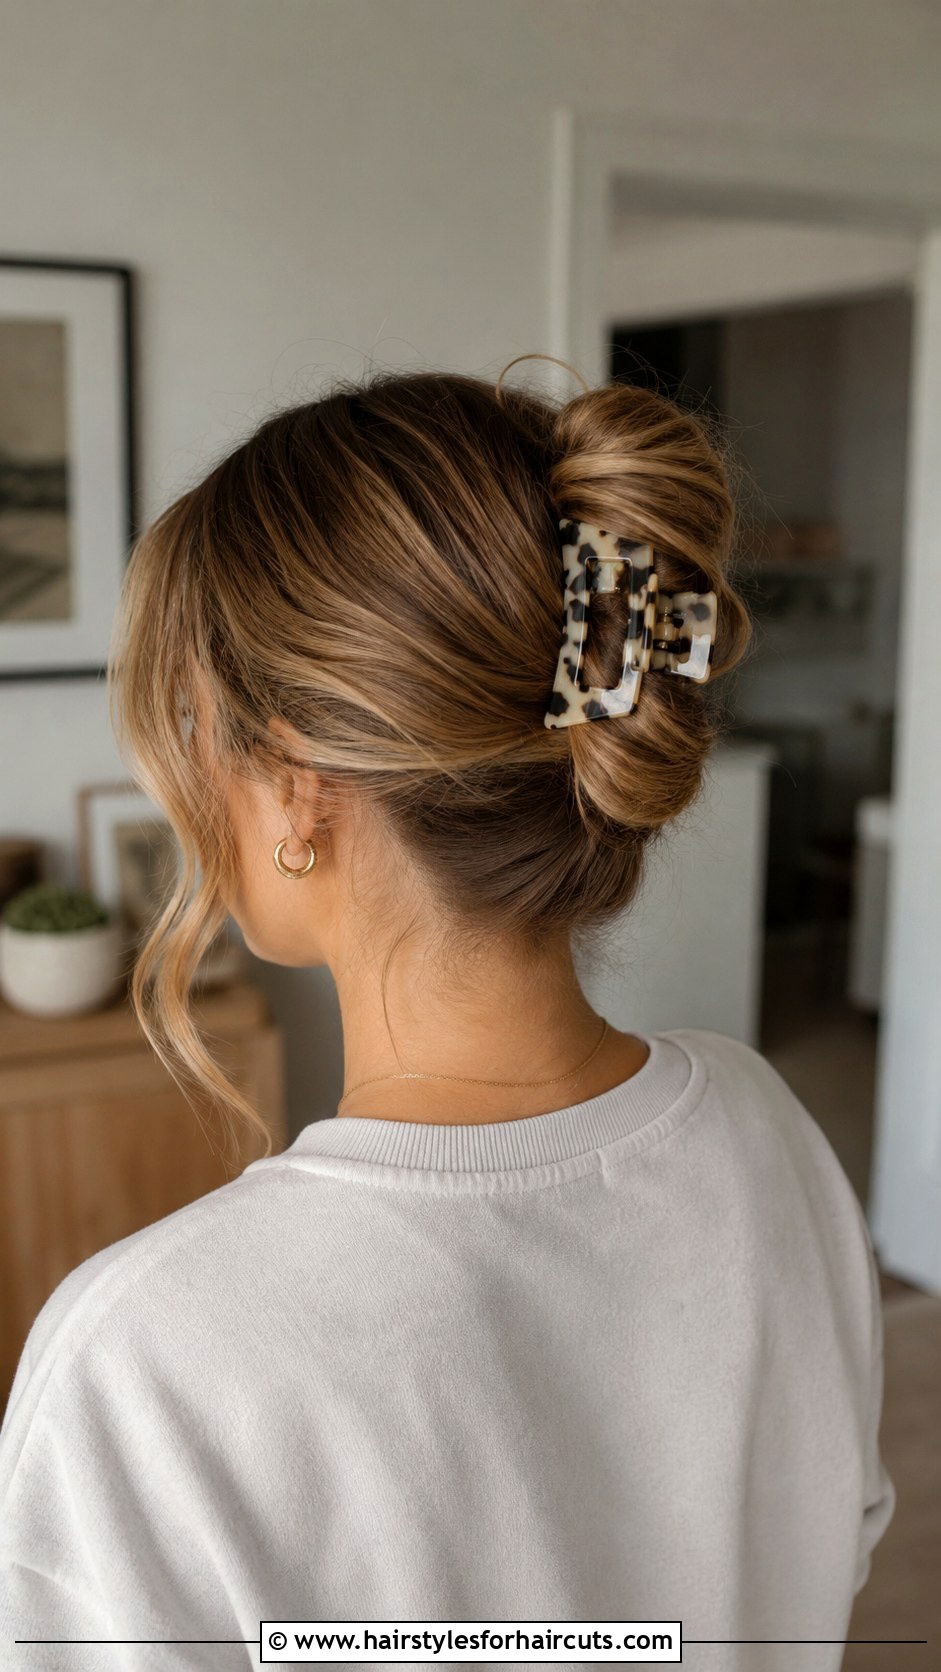
Looking for an effortlessly cool style that takes zero time? The claw clip updo is trendy and incredibly easy. Gather your hair at the nape of your neck as if you are making a low ponytail. Twist the entire length of your hair upward so it lies flat against the back of your head. Fold the twisted length down into a soft roll. Take a large, stylish claw clip and clamp it over the roll to secure it in place. Let the very ends of your hair fan out over the top of the clip for a relaxed, modern finish. This style works wonderfully on medium to long hair and looks great with second-day hair.
10. Step By Step Sleek High Ponytail Hairstyle

Want a polished and powerful look that commands attention? The sleek high ponytail is a classic choice. Brush your hair up toward the crown of your head, ensuring there are no bumps. Use a fine-tooth comb and some smoothing gel to lay down any flyaways at the roots. Secure the hair tightly with a strong elastic. For an extra sleek touch, take a small section of hair from the underside of the ponytail and wrap it around the hair tie to hide it. Pin the end of that wrap under the ponytail with a bobby pin. This glossy, elevated style instantly lifts your face and pairs perfectly with a sharp outfit or evening wear.
11. Easy Rope Braid Ponytail Hairstyle Step By Step

Tired of a boring basic ponytail but short on time? The rope braid ponytail adds a fun twist. First, pull your hair back into a high or mid-level ponytail and secure it with an elastic. Divide the ponytail into two equal sections. Twist both sections to the right. Then, cross the right section over the left section to create a rope-like effect. Continue twisting and crossing all the way down the length of your hair. Secure the bottom with another elastic. The twisting technique naturally holds the braid together without needing a third strand. It gives a textured, dynamic look to a simple ponytail in just a couple of minutes.
12. Step By Step Milkmaid Braid Hairstyle

Seeking a charming, rustic style for a sunny afternoon? The milkmaid braid gives off a cute, vintage feel. Part your hair down the middle and tie it into two low pigtails. Braid each pigtail into a standard three-strand braid and secure the ends with small elastics. Take the right braid and flip it up and over the top of your head, pinning it flat against your crown with bobby pins. Do the same with the left braid, crossing it over the top to meet the other side. Tuck the ends under each other to hide them. Pull out a few front pieces to frame your face for a softer, lived-in vibe.
13. Easy Top Knot Hairstyle Step By Step

Need a reliable hairstyle that gets your hair completely out of your face? The top knot is a daily essential. Gather all your hair up to the very top of your head, right at the crown. Secure it tightly with a hair tie, forming a high ponytail. Take the ponytail and twist it around its base, wrapping it into a tight, coiled circle. Use another elastic or a few bobby pins to secure the bun in place. For a sleeker look, smooth down the sides with a brush. If you prefer a more relaxed feel, pull a few pieces loose around your face. It is perfect for busy days or hot weather.
14. Step By Step Waterfall Braid Hairstyle
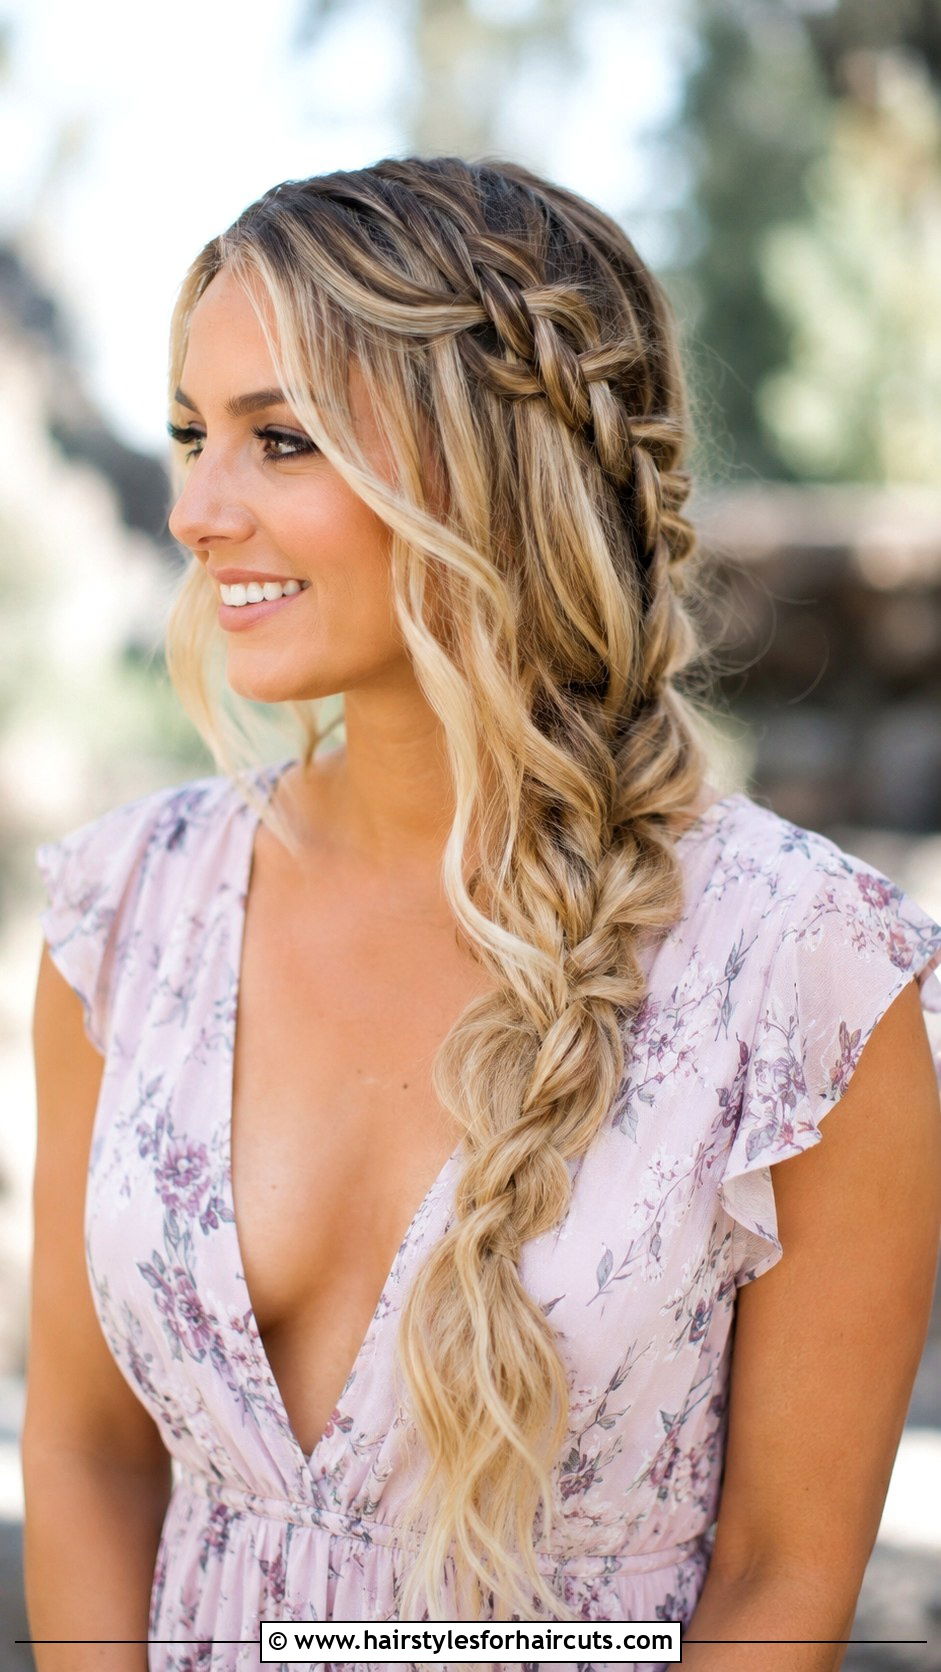
Looking to add a magical touch to your loose hair? The waterfall braid creates a stunning cascading effect. Start by taking a section of hair near your part and dividing it into three pieces. Begin a standard French braid, but when you drop the bottom strand, let it fall completely. Pick up a new section of hair from right behind it to replace the dropped strand. Continue this pattern across the back of your head, always dropping the bottom piece and grabbing a new one. This creates the illusion of hair spilling down like a waterfall. Secure the end with a bobby pin behind your ear. It looks incredibly romantic and intricate.
15. Easy Low Ponytail With Twist Hairstyle Step By Step

Want to elevate a basic low ponytail in under a minute? The twisted low ponytail adds instant sophistication. Gather your hair at the nape of your neck and tie it with a clear elastic. Once it is secure, use your fingers to create a small gap right above the hair tie, splitting the hair into two. Take the entire length of the ponytail and flip it up and through that gap, pulling it down snugly. This creates a beautiful wrapped detail around the ponytail base. For extra visual interest, you can repeat the flip one more time. This simple trick completely transforms a plain look into something elegant and refined for any occasion.
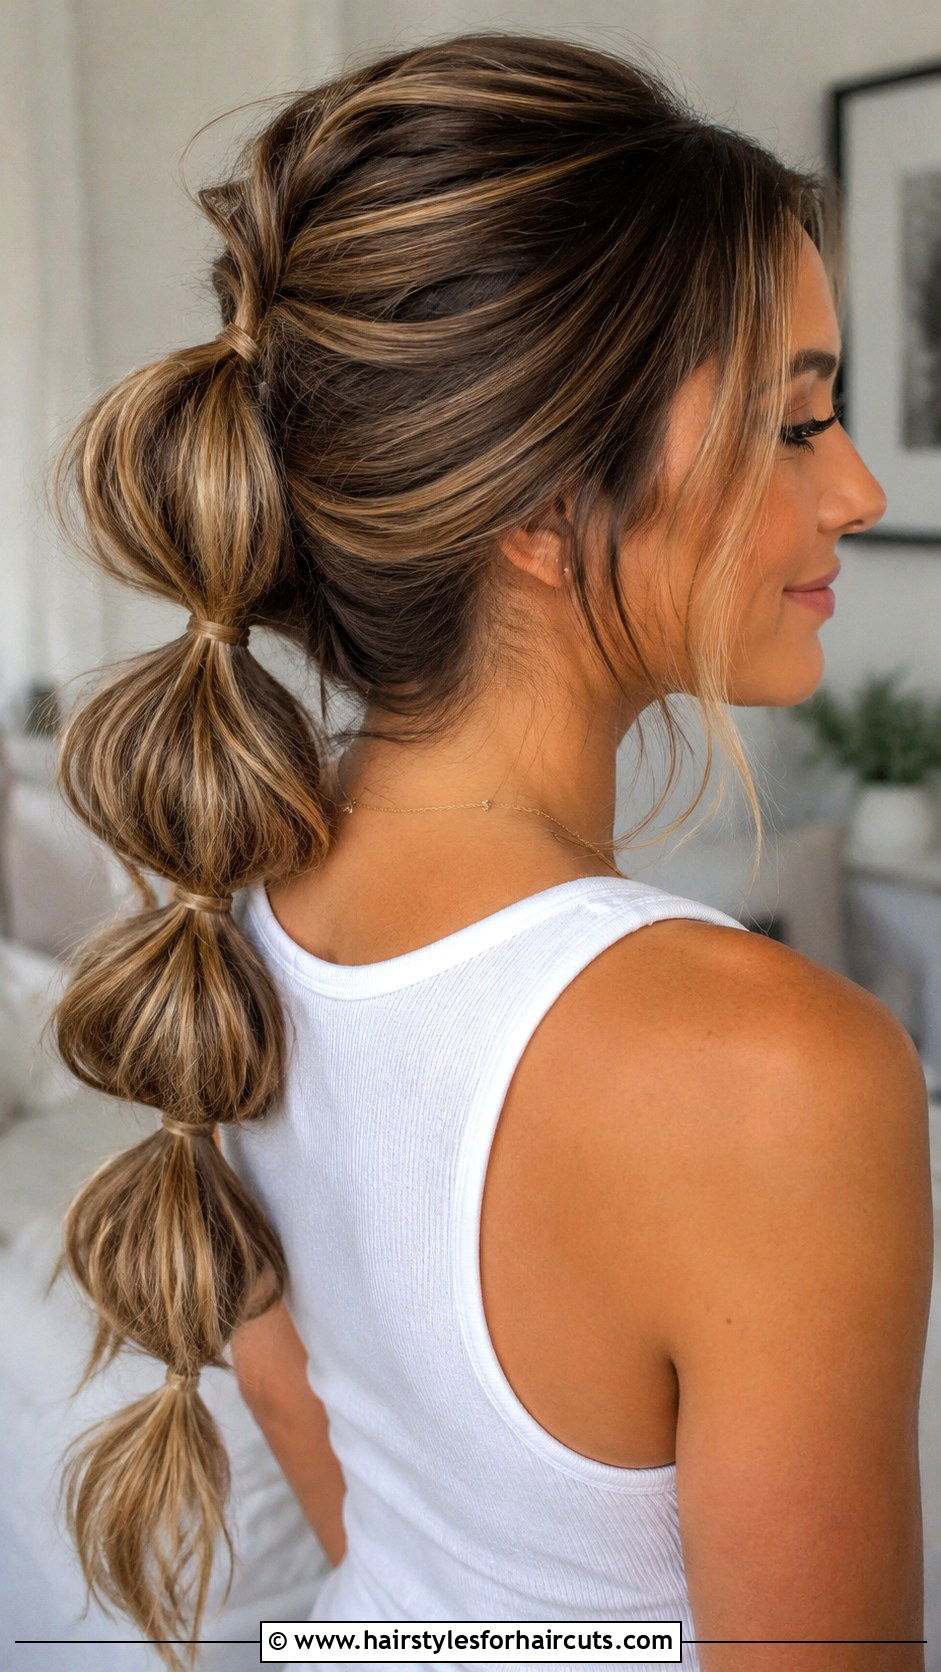
16. Step By Step Bubble Braid Hairstyle

Looking for a trendy, playful style that requires zero braiding? The bubble braid is a fun alternative. Pull your hair into a high ponytail and secure it tightly. About two or three inches down from the first elastic, wrap another small elastic around the ponytail. Gently tug at the edges of this section to puff it out, creating a bubble shape. Continue placing elastics down the length of the ponytail, puffing out each section as you go. The result is a series of round, voluminous bubbles. It is a fantastic style for casual hangouts and adds a lot of personality to your everyday hair routine without any complex weaving techniques.
17. Easy Side Swept Braid Hairstyle Step By Step

Want a soft, romantic look that frames your face beautifully? The side swept braid is a lovely choice. Sweep all your hair over to one shoulder. Divide the hair into three sections and begin a standard braid. For a more textured look, try a loose fishtail or a simple three-strand technique. As you braid down, keep the tension relatively loose so it does not look too tight against your neck. Secure the end with a clear elastic. Gently pull at the loops of the braid to make it look thicker and more voluminous. Let a few shorter layers fall naturally around your face to complete this dreamy, relaxed hairstyle.
18. Step By Step Double Dutch Braid Hairstyle

Need a sporty, secure style that will not budge? Double Dutch braids, often called boxer braids, are perfect. Part your hair straight down the middle from your forehead to the nape, tying one side out of the way. On the other side, take a front section and split it into three. Cross the outer strands under the middle, adding hair as you go. Braid all the way down to the ends and tie it off. Repeat the exact same process on the other side. This bold, raised braid style keeps your hair completely contained and looks super stylish whether you are at the gym or running errands around town.
19. Easy Messy Ponytail Hairstyle Step By Step

Craving a look that is effortlessly cool and full of volume? The messy ponytail is effortlessly chic. Gather your hair at the mid to low section of your head, but do not pull it too tight. Use your fingers rather than a brush to comb it back, leaving some texture and bumps. Secure with an elastic. Take a small section of hair from the ponytail and wrap it around the hair tie to hide it. Pull out a few face-framing pieces and gently backcomb the tail of the ponytail for extra fullness. This style looks like you just rolled out of bed in the most glamorous way possible.
20. Step By Step Tucked Ponytail Hairstyle

Searching for a sleek, refined style that works for the office? The tucked ponytail is a beautiful, polished option. Gather your hair into a smooth, low ponytail at the nape of your neck and secure it with an elastic. Create a small opening above the elastic by splitting the hair in two. Lift the entire ponytail up, flip it over, and pull it through that opening. Now, take the remaining length of the ponytail, fold it up into the twist, and pin it securely inside. This creates a clean, tucked-in roll at the back of your head. It is a classy alternative to a standard bun or ponytail.
21. Easy Boho Braided Ponytail Hairstyle Step By Step

Want a free-spirited style that looks beautifully undone? The boho braided ponytail is your answer. Start by pulling your hair back into a loose, mid-height ponytail, leaving a few strands out around your face. Take a small section of hair from the ponytail and create a simple three-strand braid. Tie off the tiny braid with a clear elastic. Take another small section from the ponytail and wrap it around the main hair tie to hide it, pinning it underneath. Gently pull at the edges of the tiny braid and the main ponytail to create a thick, relaxed texture. This gives a beautiful, festival-ready vibe in just a few simple moves.
22. Step By Step Bow Bun Hairstyle

Looking for a whimsical and unique style that stands out? The bow bun is absolutely adorable. Pull your hair into a high ponytail and secure it. On the final loop of your elastic, only pull the hair halfway through, creating a small looped bun. Split this loop into two halves to form the sides of the bow. Take the remaining loose ends of the ponytail and pull them up between the two loops, pinning it securely to create the center of the bow. Adjust the loops so they look even and full. This playful style is surprisingly easy and adds a fun, creative touch to your everyday look.
23. Easy Pull Through Braid Hairstyle Step By Step
Want massive braid volume without having to actually weave anything? The pull through braid gives the illusion of a thick, complex plait. Create a high ponytail and secure it. Take a small section of hair from the top of the ponytail and clip it out of the way. Tie a small elastic around the remaining hair, just below the first one. Drop the clipped section down and split it in two. Take a new section from underneath, tie it, and cross the split pieces over it. Continue this tying and crossing pattern down the ponytail. Pancake the edges for incredible volume. It looks totally impressive but uses only elastics and simple pulling.
24. Step By Step Braided Headband Hairstyle

Need a clever way to keep bangs and layers out of your eyes? The braided headband is a practical and pretty solution. Take a one to two inch section of hair just behind your left ear. Create a standard three-strand braid with this section and tie it off with a small elastic. Lift the braid up and across the top of your head like a headband. Pin it securely on the right side of your head, hiding the pin under your hair. You can do this on both sides for a double headband effect. Leave the rest of your hair down and wavy for a soft, romantic finish.
25. Easy Twisted Low Bun Hairstyle Step By Step

Dreaming of an elegant updo that requires minimal effort? The twisted low bun is a sophisticated classic. Part your hair down the middle and take a one-inch section from each side of the front. Twist each section away from your face and bring them to the back of your head, crossing them over each other. Pin them in place. Gather all the remaining hair at the nape, including the twisted ends. Twist the entire tail of hair into a tight rope and wrap it around itself to form a neat bun. Secure the bun with bobby pins. This gorgeous look is perfect for work or a special dinner out.
Conclusion:
Mastering stunning hair does not have to be complicated or time-consuming. With these 25 hairstyles easy step by step, you now have a full arsenal of beautiful looks for any occasion. From sleek ponytails to playful braids, each guide shows how simple it is to change up your style. Practice makes perfect, so do not get discouraged if a braid looks a little messy on the first try. Keep your tools handy, use good elastics, and have fun experimenting with different textures and volumes. Whether you have five minutes or twenty, there is always a gorgeous option waiting for you. Enjoy your new hair confidence and rock these amazing styles every single day.

Leave a Reply