
Have you ever stared in the mirror, scissors in hand, wondering if you can actually pull off trimming your own hair? You are certainly not alone. Taking the plunge into cutting your own hair can feel incredibly daunting, but it is also empowering and surprisingly practical. Whether you are trying to save money, extend the life of your last salon visit, or simply want a fresh new look without leaving your bathroom, mastering a few basic techniques is completely doable. From subtle trims to dramatic chops, there is a DIY method for nearly every length and texture out there. This guide covers 25 self haircuts that you can confidently tackle at home. Grab your shears, section your strands, and get ready to transform your look with these approachable, step-by-step DIY haircut options.

1. DIY Blunt Bob Cut

Craving a sharp, clean look without the salon price tag? The blunt bob is a timeless choice that you can absolutely achieve on your own. Start by dampening your hair and combing it straight down. Pull all your hair into a low ponytail at the nape of your neck, ensuring there are no bumps. Secure it with an elastic at the exact length you want your bob to hit. Take a second elastic a couple of inches below the first one to keep the hair taut. Hold the ponytail firmly and make one clean, horizontal snip right above the bottom elastic. Take the ponytail out, comb your hair down, and make any tiny adjustments to ensure the bottom is perfectly straight.
2. Self Layered Haircut

Want more movement and volume in your hair without paying for professional layers? The ponytail method for layering is a game-changer for DIY enthusiasts. Brush all your dry hair up to the very top of your forehead, creating a high unicorn ponytail. Secure it tightly right at your hairline. Slide the elastic down the ponytail to the length you want your shortest layers to be. Carefully hold the ends of the ponytail and snip straight across. Because your hair is pulled directly upward, cutting it straight creates beautiful, cascading layers when you let it down. This technique works wonderfully on medium to long hair, giving you a face-framing effect that looks naturally blended and incredibly bouncy.
3. Easy Curtain Bangs Haircut

Looking for that perfect face-framing fringe? Curtain bangs are highly flattering and surprisingly simple to cut yourself at home. Start by parting your hair right down the middle. Take a triangular section from the outer corners of your eyebrows up to your crown, and tie the rest of your hair back. Mist this section lightly with water. Split the triangle down the middle into a right and left side. Pull one side down at a 45-degree angle toward the opposite side of your face, and cut at your desired length. Repeat on the other side. Pulling the hair forward and across creates that soft, sweeping shape that beautifully blends into the rest of your hair.
4. DIY Shag Haircut

Ready to embrace that cool, effortlessly messy vibe? The modern shag is all about texture and choppy layers, making it a fantastic option for a DIY cut. You will want to work with dry hair so you can see exactly how the layers will fall. Flip your head upside down and gather your hair into a top-of-the-head ponytail. Snip off the very ends, keeping your cuts vertical rather than horizontal to avoid a blunt line. Let your hair down, shake it out, and assess the length. You can take smaller sections around your face and cut them at an angle for a more lived-in look. The key is cutting less than you think you need.
5. At Home Long Bob Cut
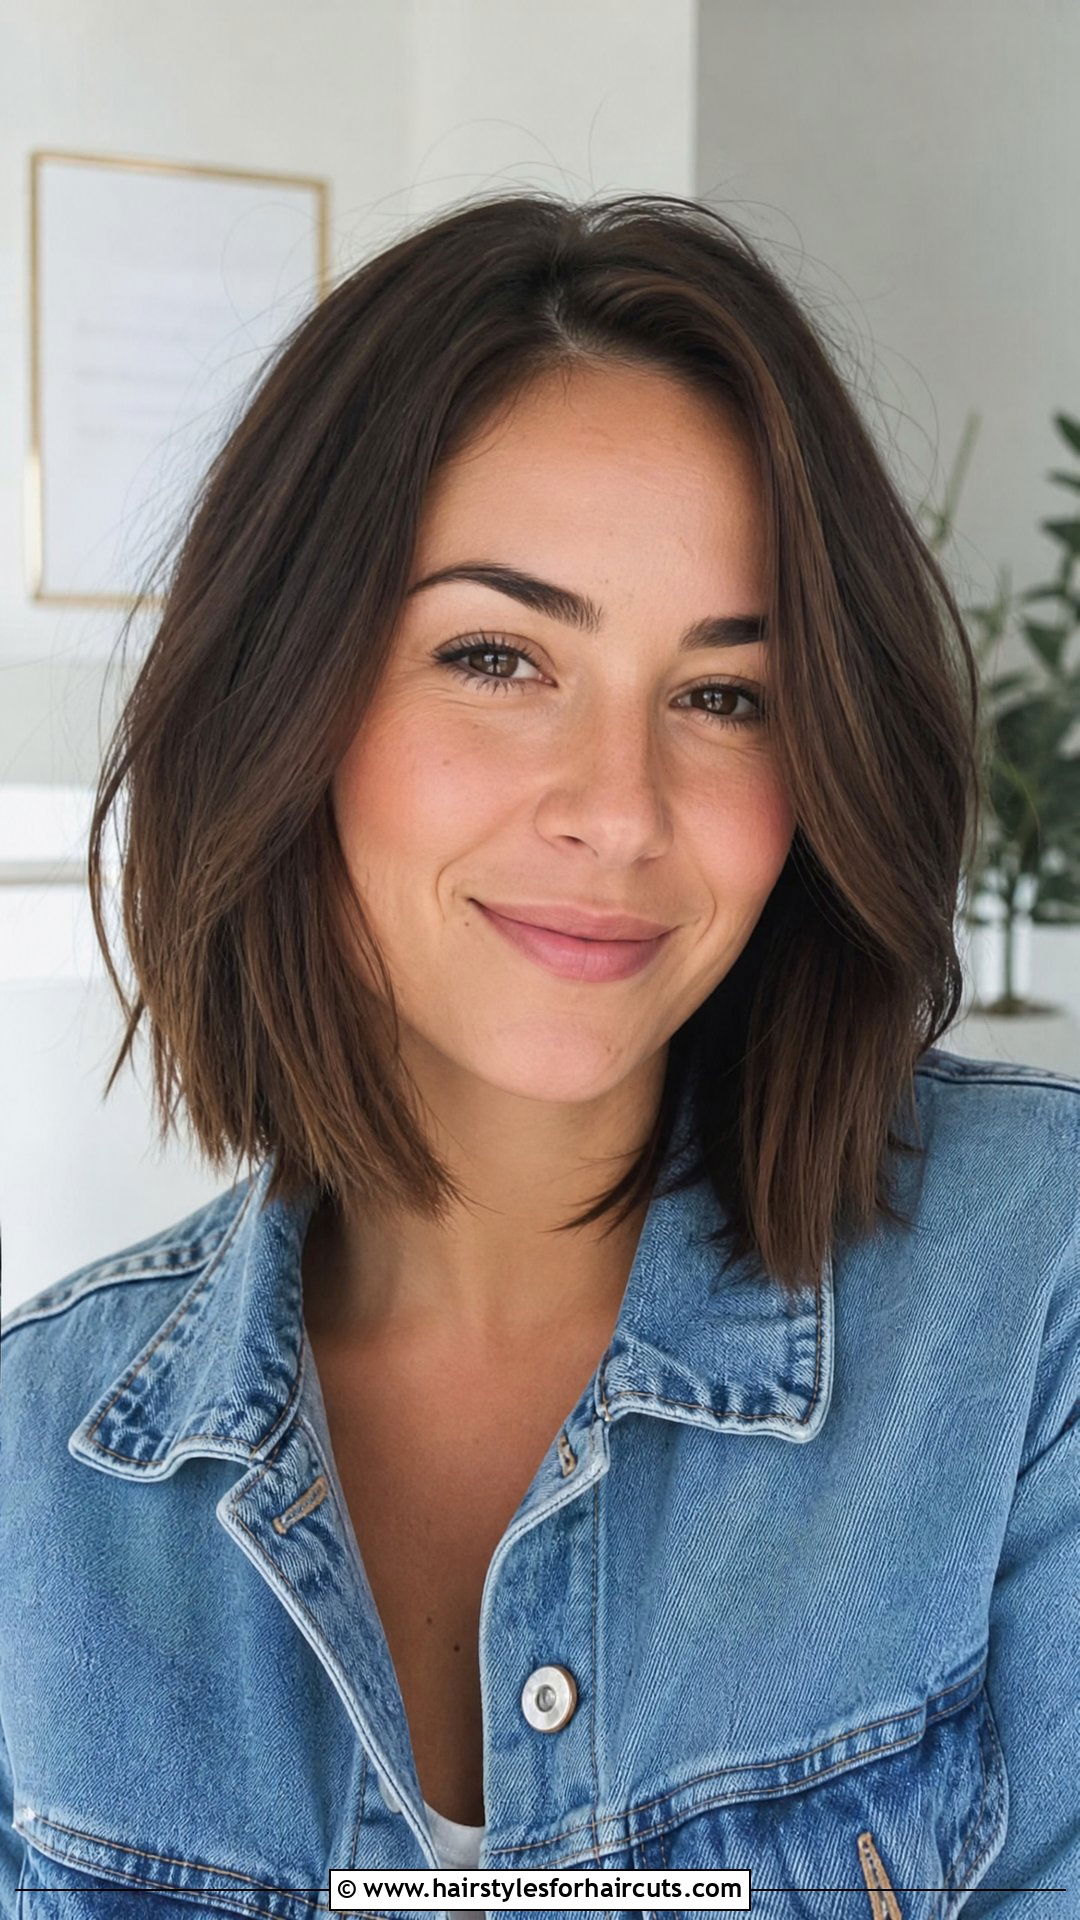
Dreaming of a chic collarbone-grazing style? The long bob, or lob, is incredibly versatile and manageable to cut yourself. Part your damp hair down the middle all the way to the back of your head. Pull the front sections forward and securely clip the back out of the way. Starting with the back section, comb it straight down and carefully cut a slight curve upward from the center back to the sides. Unclip the front sections, bring them back to match the guide you just cut, and snip at a soft angle. Cutting at a slight angle ensures the front pieces fall perfectly and frame your face without any harsh lines.
6. Trim Long Hair At Home
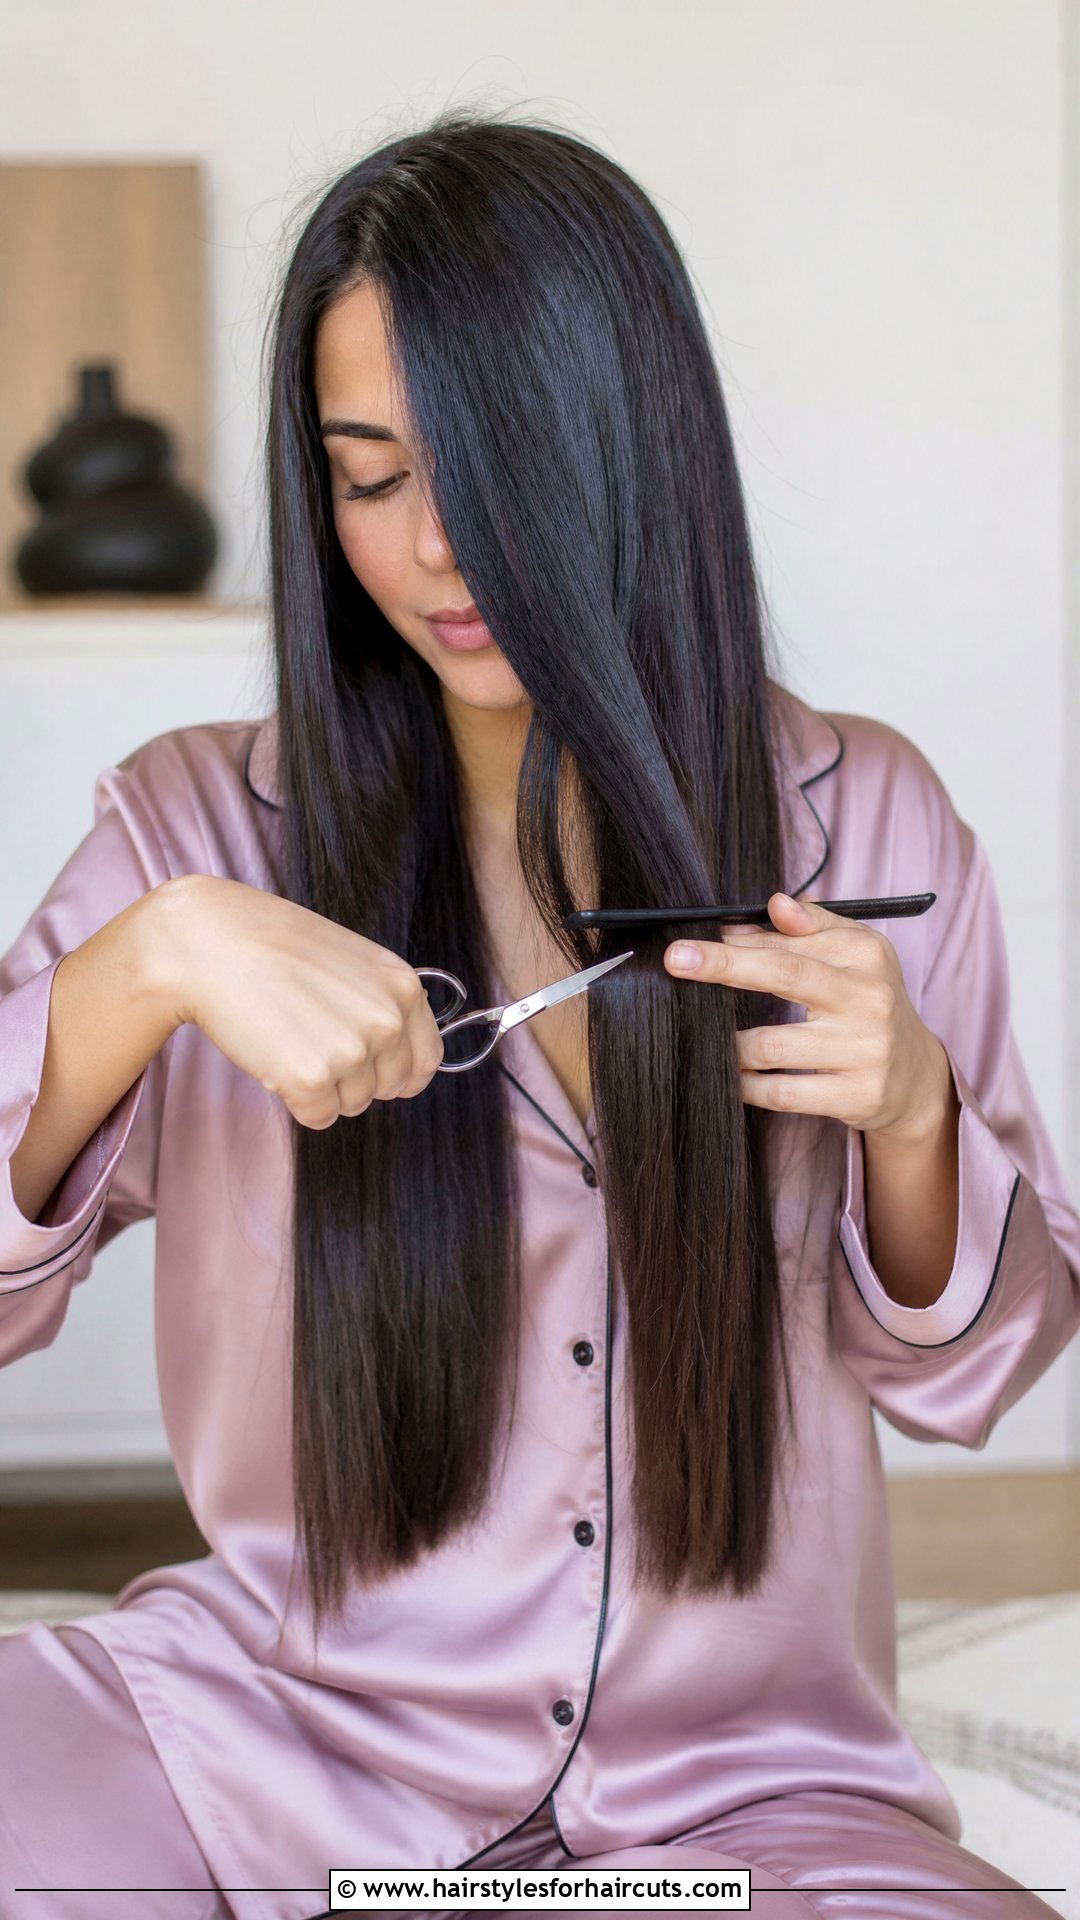
Tired of split ends ruining your long locks? Trimming your own long hair is a breeze with the twist method. Part your damp hair down the middle, creating two equal sections on each side of your neck. Twist one section tightly all the way down to the ends. You will notice shorter, damaged hairs poking out of the twist. Carefully snip these stray ends away. Then, simply trim the very bottom of the twist to maintain your overall length. Unravel and repeat on the opposite side. This twist-and-snip technique safely removes dead ends and broken strands without accidentally chopping off too much length, leaving your long hair looking incredibly healthy.
7. Self Pixie Cut
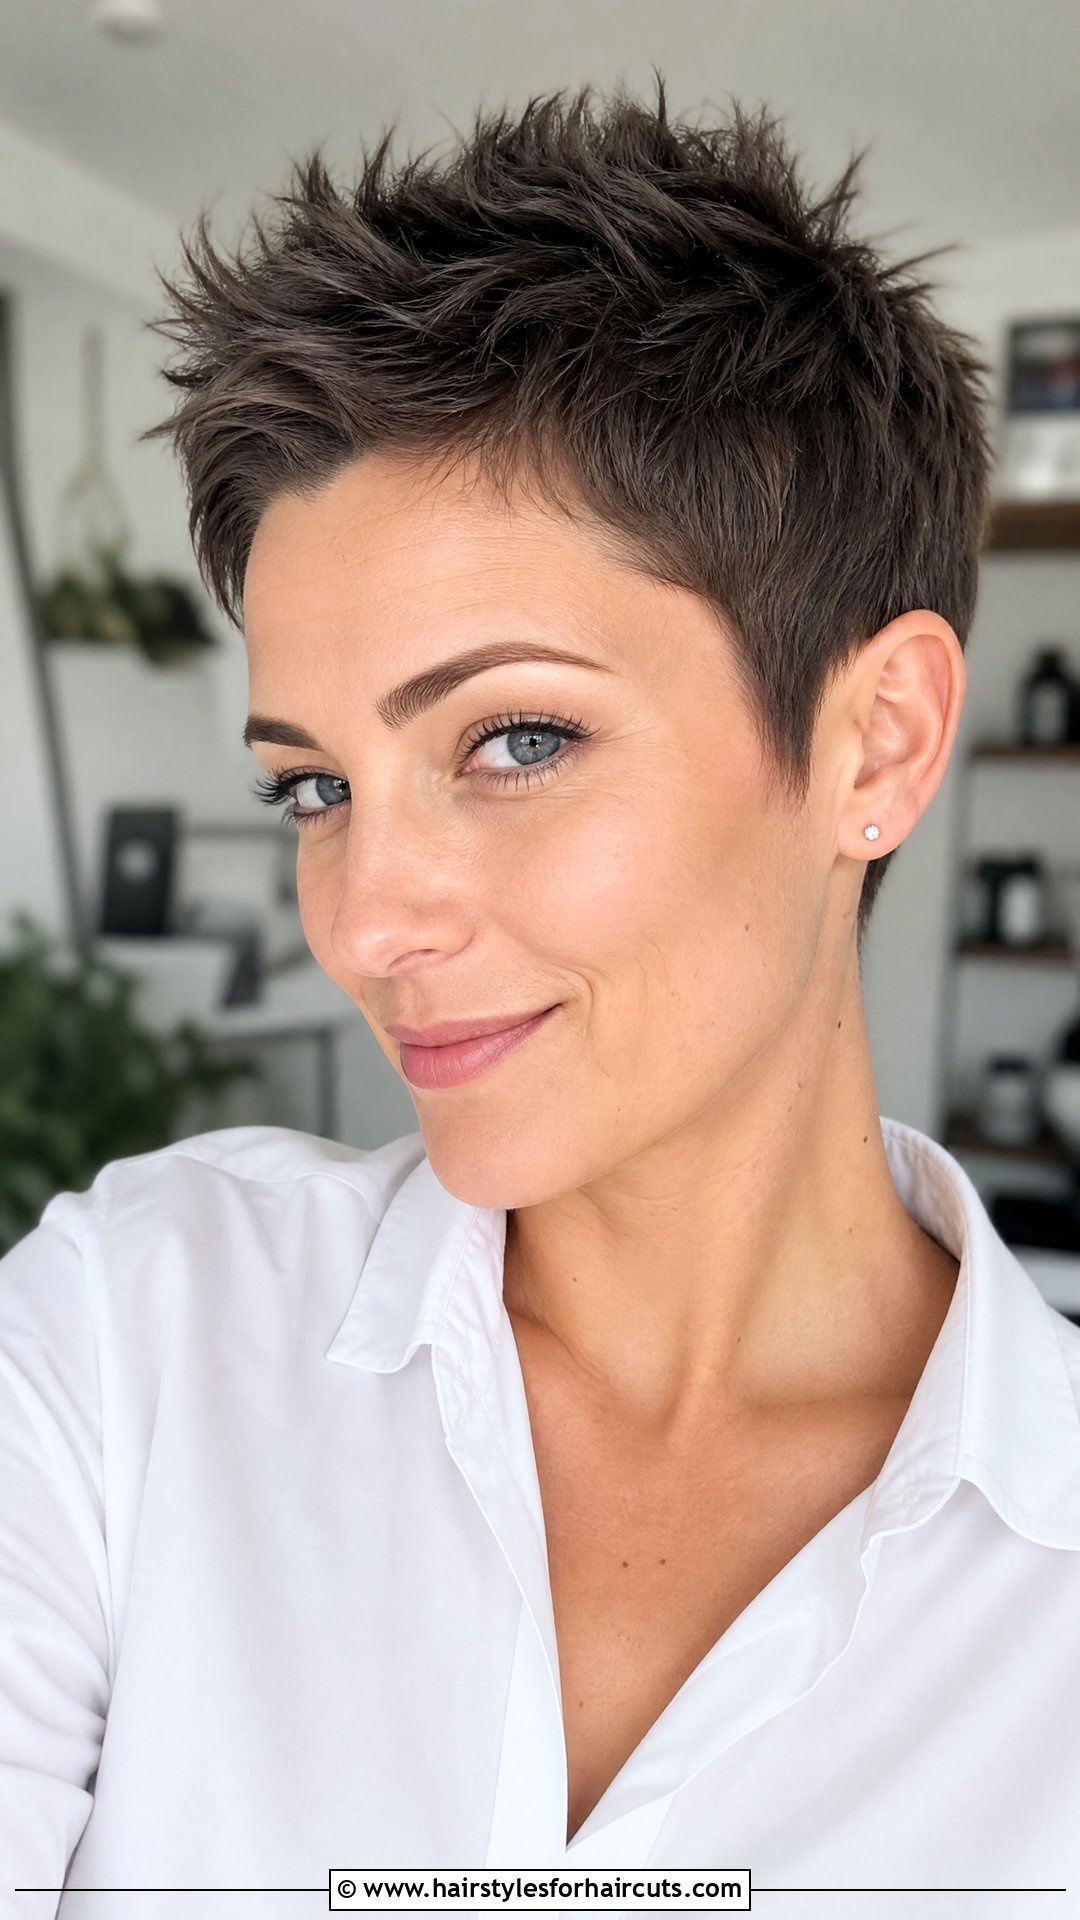
Feeling bold enough for a super short style? Cutting your own pixie requires a steady hand and extreme patience. Start with dry, freshly washed hair. Use clippers with a longer guard to trim the back and sides, working your way up but leaving the top section longer. For the top, use your fingers to lift small sections straight up and point-cut into the ends. Point-cutting means holding the scissors vertically and snipping upward, which creates a soft, textured edge. Carefully blend the longer top into the shorter sides using the same point-cutting technique. Take your time, cut tiny amounts, and constantly check your reflection to ensure an even finish.
8. DIY Curly Girl Cut

Want bouncy, perfectly shaped curls? The curly girl cut should always be done on dry, fully styled hair. This allows you to see exactly how each curl naturally falls. Take one curl at a time, pull it down gently toward your face, and snip off just the very tip. This prevents you from cutting off too much volume. Work your way around your entire head, carefully trimming each ringlet individually. You can also trim the curls that frame your face slightly shorter to create a natural, face-framing effect. By cutting each curl individually, you maintain your beautiful natural curl pattern and avoid the dreaded triangle shape.
9. DIY Wolf Cut

Obsessed with the trendy, rock-and-roll aesthetic? The wolf cut is heavily layered and packed with amazing texture. Pull the top half of your hair into a high ponytail and secure it tightly at your crown. Cut the ends of this ponytail to your desired shortest layer length. Next, gather the bottom half of your hair into a low ponytail at the nape of your neck, and cut this section to your preferred overall length. Let your hair down, shake it out, and use thinning shears or point-cutting to add choppy texture throughout. This creates that perfectly undone, shaggy vibe that looks effortlessly cool and stylish.
10. DIY Micro Bangs

Want to make a bold, retro statement? Micro bangs are striking and much easier to cut yourself than you might actually think. Start by isolating a very small, triangle-shaped section at the very front of your hairline, clipping the rest of your hair securely back. Keep the section narrow, ending right at the inner corners of your eyebrows. Comb this small section straight down, hold it firmly between two fingers, and cut straight across just above your eyebrows. Cut slightly longer than you want them, as they will shrink up slightly when dry. The result is a beautifully edgy, face-framing fringe that truly pops.
11. DIY Face Framing Layers

Looking for a soft, seamless way to update your style? Face-framing layers add beautiful dimension without altering your overall length. Part your hair as you normally wear it. Take a one-inch section of hair right at your front hairline on each side. Pull the rest of your hair back out of the way. Comb the front sections straight down, and starting at your chin, angle your scissors down toward your collarbone. This creates a long, sweeping layer that gently frames your face. You can add a second, slightly shorter layer by repeating the process with another half-inch section behind the first. This subtle change completely brightens your look.
12. Self V-Cut Long Hair

Love the look of a dramatic, tapered back? The V-cut gives you stunning length on the sides with a sharp point in the back. Brush your damp hair straight back and gather it into a low ponytail at the nape of your neck. Split the ponytail into two equal sections. Pull the right section to the left and snip the end at a steep angle, then pull the left section to the right and cut the matching corresponding angle. When you let your hair down, the two angles meet to form a perfect, soft V-shape. This removes bulk from the sides while keeping the center back strikingly long.
13. DIY Choppy Layers

Craving a messy, textured aesthetic? Choppy layers bring incredible volume to any hair length. The easiest way to achieve this is by using the twist-and-snip method on small sections. Take a one-inch section of dry hair, twist it tightly from root to tip, and hold it straight out away from your head. Use your scissors to cut small, uneven notches into the twisted ends. Do not cut straight across; instead, make little V-shaped cuts directly into the twist. Release the section, and you will see beautifully fragmented, choppy pieces. Repeat this all over your head, focusing on the top and sides, for an edgy, heavily textured finish.
14. Self Trim 4C Hair

Need to get rid of pesky single strand knots? Trimming your 4C hair at home is totally possible when you work in small, manageable sections. Always stretch your hair first using a blow dryer or by banding it, as trimming stretched hair ensures an even, precise cut. Take down one section at a time, comb it through gently, and search for split ends or knots. Snip the damaged ends individually, or trim a quarter-inch off the bottom of the section to maintain your shape. Working slowly on stretched hair gives you total control over how much you remove, keeping your beautiful coils healthy and thriving.
15. DIY Textured Bob
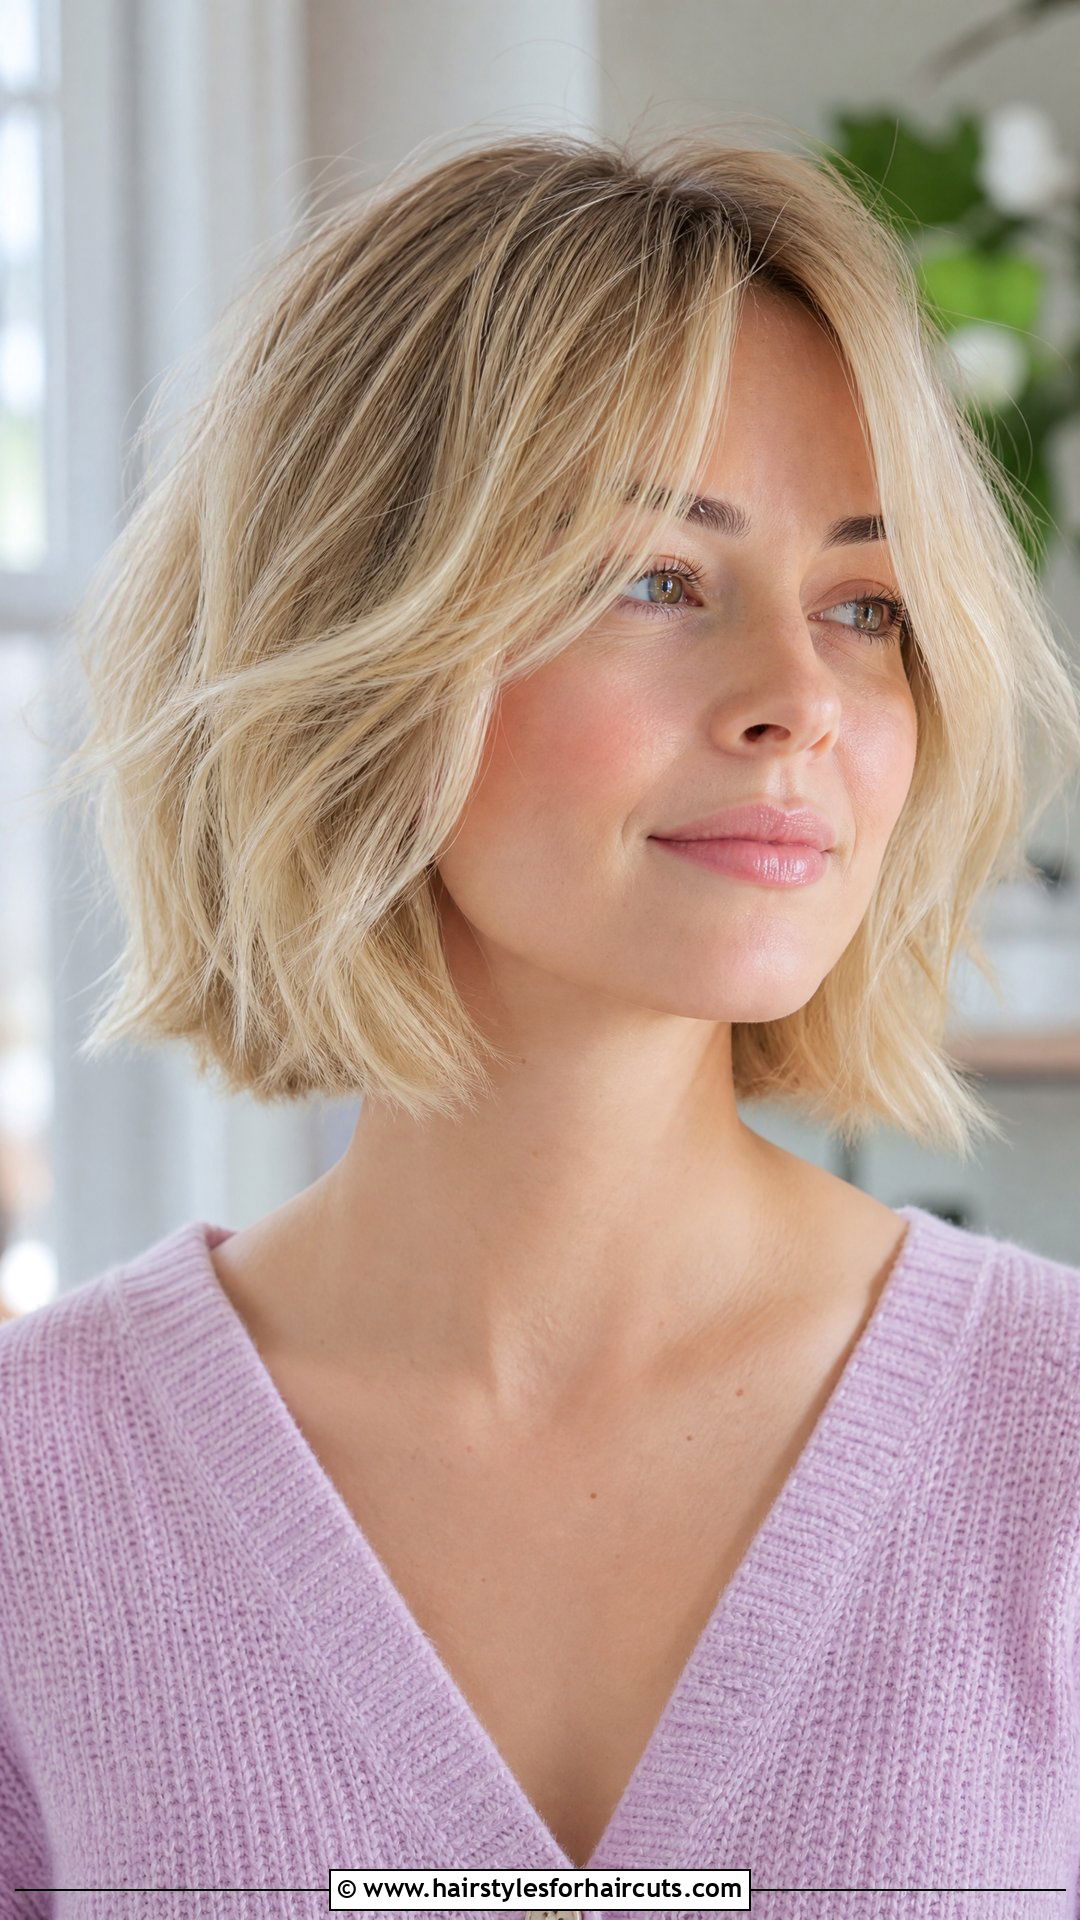
Want a bob that feels light and bouncy? A textured bob removes the heavy bluntness of a traditional cut. First, cut your damp hair into a basic bob using the low-ponytail method. Once you have your baseline length, dry your hair completely. Then, take small sections of your dry hair and point-cut into the ends. Hold the scissors vertically and snip upward into the bottom edge. This instantly removes weight from the ends and creates a soft, feathered appearance. You can also pull random small sections upward and twist them, snipping the ends to add extra movement. The result is a relaxed, airy bob that flips perfectly.
16. DIY Asymmetrical Bob

Ready for a bold, edgy upgrade? The asymmetrical bob features one side noticeably longer than the other, creating a striking silhouette. Part your damp hair exactly on the side where you want the longer length to fall. Pull all your hair over to the opposite side of your part, creating a low side ponytail at the nape of your neck. Slide the elastic down to your desired length for the shorter side, and cut straight across. Let your hair down, comb it smooth, and carefully trim the longer side to your exact preference. This off-center approach gives you an effortlessly cool look.
17. Self Undercut

Looking to shave off some weight and stay cool? An undercut removes bulk from the underneath sections while leaving the top section long. Separate the top section of your hair and clip it securely up and out of the way. The lower section that remains will be your undercut area. Use electric clippers with your preferred guard length. Start clipping from the nape of your neck, moving steadily upward toward the clipped top section. Work slowly and check your progress in a hand mirror to ensure the line where the long hair meets the short hair is completely even. This creates a really striking, edgy contrast.
18. DIY Buzz Cut

Ready for the ultimate low-maintenance look? Giving yourself a buzz cut is incredibly liberating and wonderfully simple. All you need is a reliable pair of clippers and your chosen guard size. Start from the front of your hairline and move the clippers straight back over the top of your head. Always move against the direction your hair naturally grows to ensure a perfectly even cut. Next, tackle the sides, moving the clippers straight upward from your temples to the top. Finally, do the back, starting at the nape and moving up. Use a hand mirror to carefully check the back for any uneven spots.
19. Self Trim Wavy Hair

Want to enhance your natural waves without ruining your natural pattern? Trimming wavy hair requires a gentle touch and a very specific approach. Always work with your hair completely dry and styled naturally, so you can clearly see the exact shape of your waves. Gather your hair into a low ponytail at the nape of your neck and secure it tightly with an elastic. Pull the elastic down to just above where you want to trim. Hold the ponytail firmly, and point-cut into the ends instead of cutting straight across. This perfectly preserves the softness of your waves and prevents a blunt, unnatural bottom line.
20. DIY Feathered Layers

Longing for that retro, voluminous flip? Feathered layers are all about sweeping curves and bouncy volume. Cut your base length first using the simple low ponytail method. Once your hair is completely dry, take a small section of hair and hold it straight out to the side. Point your scissors outward, away from your face, and make tiny snips into the ends of the section. This outward cutting motion forces the hair to flip up and away from the face, creating that signature feathered texture. Work your way around your entire head, focusing on the layers that frame your face and the bottom edges.
21. DIY Long Layers

Want to keep your length but add some much-needed dimension? Cutting long layers yourself is easily done with the high ponytail technique. Brush your dry hair up into a very high, tight ponytail right at the very top of your forehead. Decide exactly how short you want your top layers to be, and slide an elastic down to that exact point. Hold the hair firmly above the bottom elastic and make one straight, clean cut directly across. Let your hair down, shake it out, and you will instantly see beautiful, flowing layers. The high placement of the ponytail ensures the layers are nicely concentrated around your face.
22. Self Trim Straight Hair

Searching for a flawless, perfectly even trim on straight hair? The simple twist method is your best friend for maintaining precision. Part your damp hair down the center and bring it forward over your shoulders. Twist one side tightly all the way to the end. Hold the twist taut, and carefully clip the very end at your desired length. Repeat on the other side, making sure both twists are exactly the same length. Let the twists loose, comb your hair straight down, and make any final, tiny adjustments. This method guarantees a perfectly symmetrical cut that beautifully highlights the natural sleekness of straight hair.
23. DIY Shoulder Length Cut

Hoping to chop off some length for a fresh, shoulder-grazing style? This cut is effortlessly chic and surprisingly easy to maintain. Start by parting your damp hair straight down the middle, bringing both sides forward in front of your shoulders. Comb one side perfectly smooth and hold it tightly between your middle and index fingers. Slide your fingers down to your collarbone, and make one clean cut right below your fingers. Repeat on the other side, using the first side as your guide. Comb both sides together in the back to ensure the length matches. You will walk away with a sleek, easy shoulder-length bob.
24. Self Layered Medium Hair

Need to add some bounce to your medium-length locks? The simple two-ponytail method creates gorgeous, subtle layers. Gather the top half of your hair into a high ponytail, and put the bottom half into a low ponytail at the nape of your neck. Cut the top ponytail to where you want your shortest layers to hit, usually right around the cheekbone. Then, take down the bottom ponytail and trim it to your desired overall length. When you take out the elastics, the shorter top sections blend perfectly into the longer bottom sections. This gives you a beautifully layered, voluminous look without any harsh lines.
25. DIY French Bob
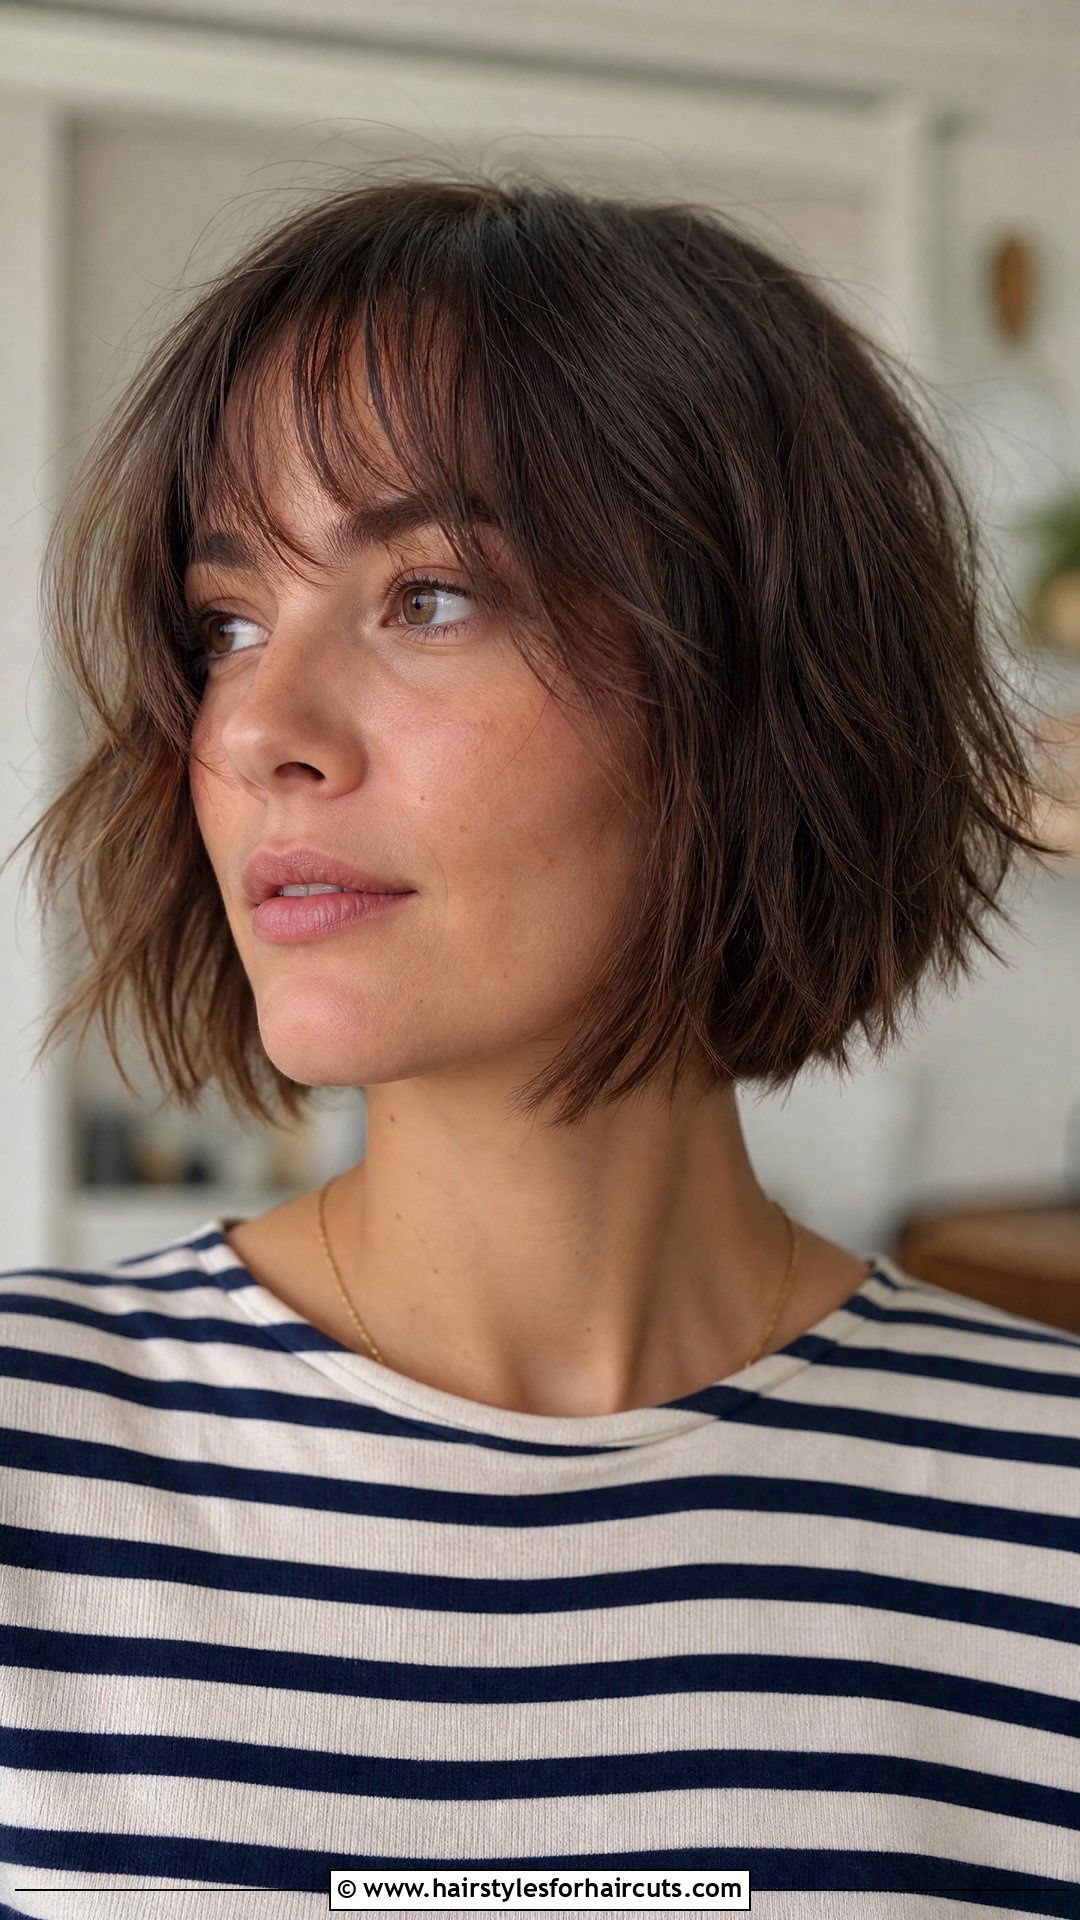
Craving a chic, jawline-grazing look with plenty of texture? The French bob is effortlessly elegant and highly textured. Start with the simple blunt bob ponytail method, but cut the length right up to your chin. Once the base cut is done and your hair is completely dry, take small sections and point-cut deeply into the ends. Hold your scissors vertically and make deep snips to remove bulk and create a piece-y look. You can also add some short, wispy curtain bangs to the front. The heavy texture is exactly what separates this from a standard bob, giving it that perfectly undone, Parisian feel.
Conclusion:
Taking the leap to cut your own hair can feel intimidating at first, but as you can see, there are so many approachable techniques available for every length and texture. Whether you are using the simple ponytail method for long layers or point-cutting for a textured French bob, the key is to start small and always cut less than you think you need. Hair grows back, so there is no need to panic. Armed with sharp shears, a little patience, and these step-by-step guides, you can absolutely achieve salon-worthy results right at home. Remember to invest in good tools, take your time, and embrace the empowering process of giving yourself a fresh, beautiful new look.

Leave a Reply