Have you ever wanted to master the art of cutting hair from the comfort of your own home? Whether you are looking to save money on salon visits or simply want to touch up your style between appointments, learning the basics can be incredibly empowering. This comprehensive 25 haircuts tutorial is designed to walk you through a wide variety of trendy and classic looks suitable for all hair types and lengths. From modern shags and layered bobs to chic pixie cuts and blunt styles, there is something here for everyone. We have carefully researched and compiled step-by-step guidance to help you achieve salon-quality results. Grab your shears, comb, and clips, and get ready to transform your look with confidence and precision today.

1. Long Layered Haircut Tutorial

Imagine sweeping your fingers through perfectly cascading lengths that boast ultimate bounce and movement. The long layered haircut is a timeless choice for anyone wanting to remove bulk while maintaining their overall length. To achieve this look at home, start by pulling your hair into a high ponytail at the front hairline. Snip the ends straight across to establish your guide. Let your hair down, blend the cut using vertical snips, and use point cutting to soften the ends. This technique creates seamless layers that frame the face beautifully. It works wonderfully on straight and wavy textures, giving you that effortlessly voluminous finish without sacrificing the length you love.
2. Blunt Bob Haircut Tutorial

Are you ready for a sharp and sophisticated change that exudes modern elegance? The blunt bob haircut is all about clean lines and precise edges that make a bold statement. Begin by dampening your hair and parting it down the middle from the front to the nape. Clip up the top sections and start at the back, cutting a straight horizontal line using fine horizontal sections. Work your way up, ensuring every strand aligns perfectly with your guide. This cut is ideal for fine hair because the untextured ends create the illusion of thicker, denser locks. Keep your tension consistent for an even, flawless finish that looks professionally done every single time.
3. Pixie Cut Haircut Tutorial
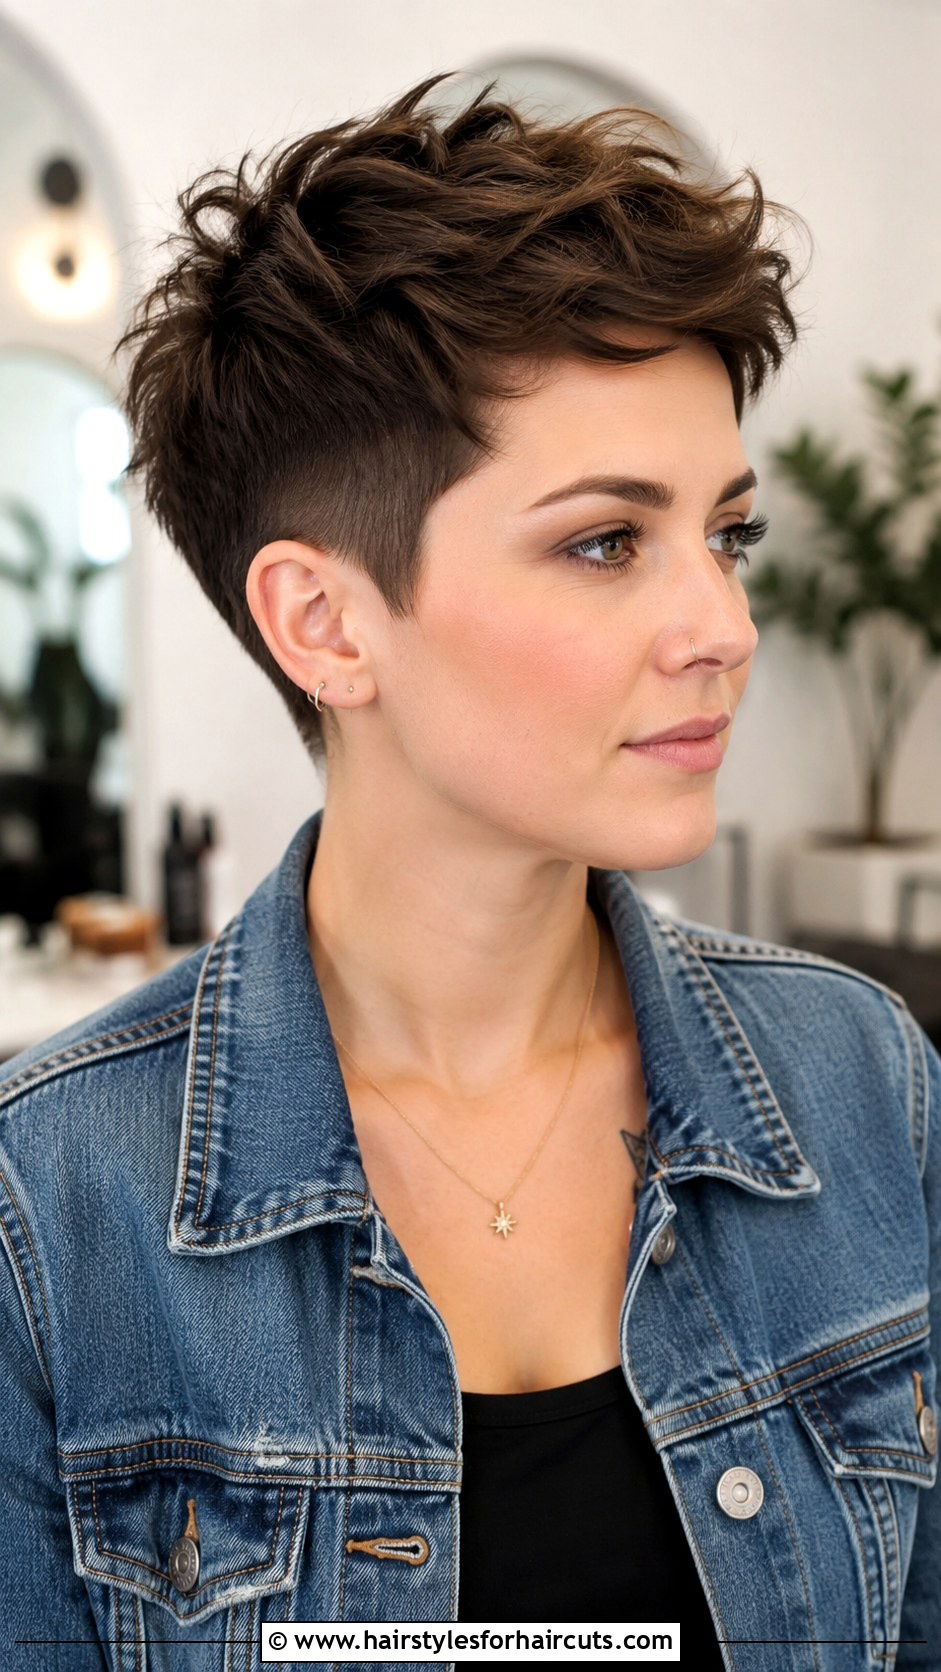
Nothing feels quite as liberating as shedding excess weight for a chic, short style. The pixie cut is a daring and beautiful choice that highlights your facial features. Start by separating the top from the sides and back. Taper the sides and back using clippers or scissors over comb, gradually leaving more length as you move up. The top should be cut to your desired length, using point cutting to add texture and prevent a blocky look. Blend the top into the shorter sides seamlessly. This iconic cut is incredibly low maintenance and perfect for anyone wanting a bold transformation that remains stylish and easy to manage every day.
4. Butterfly Haircut Tutorial
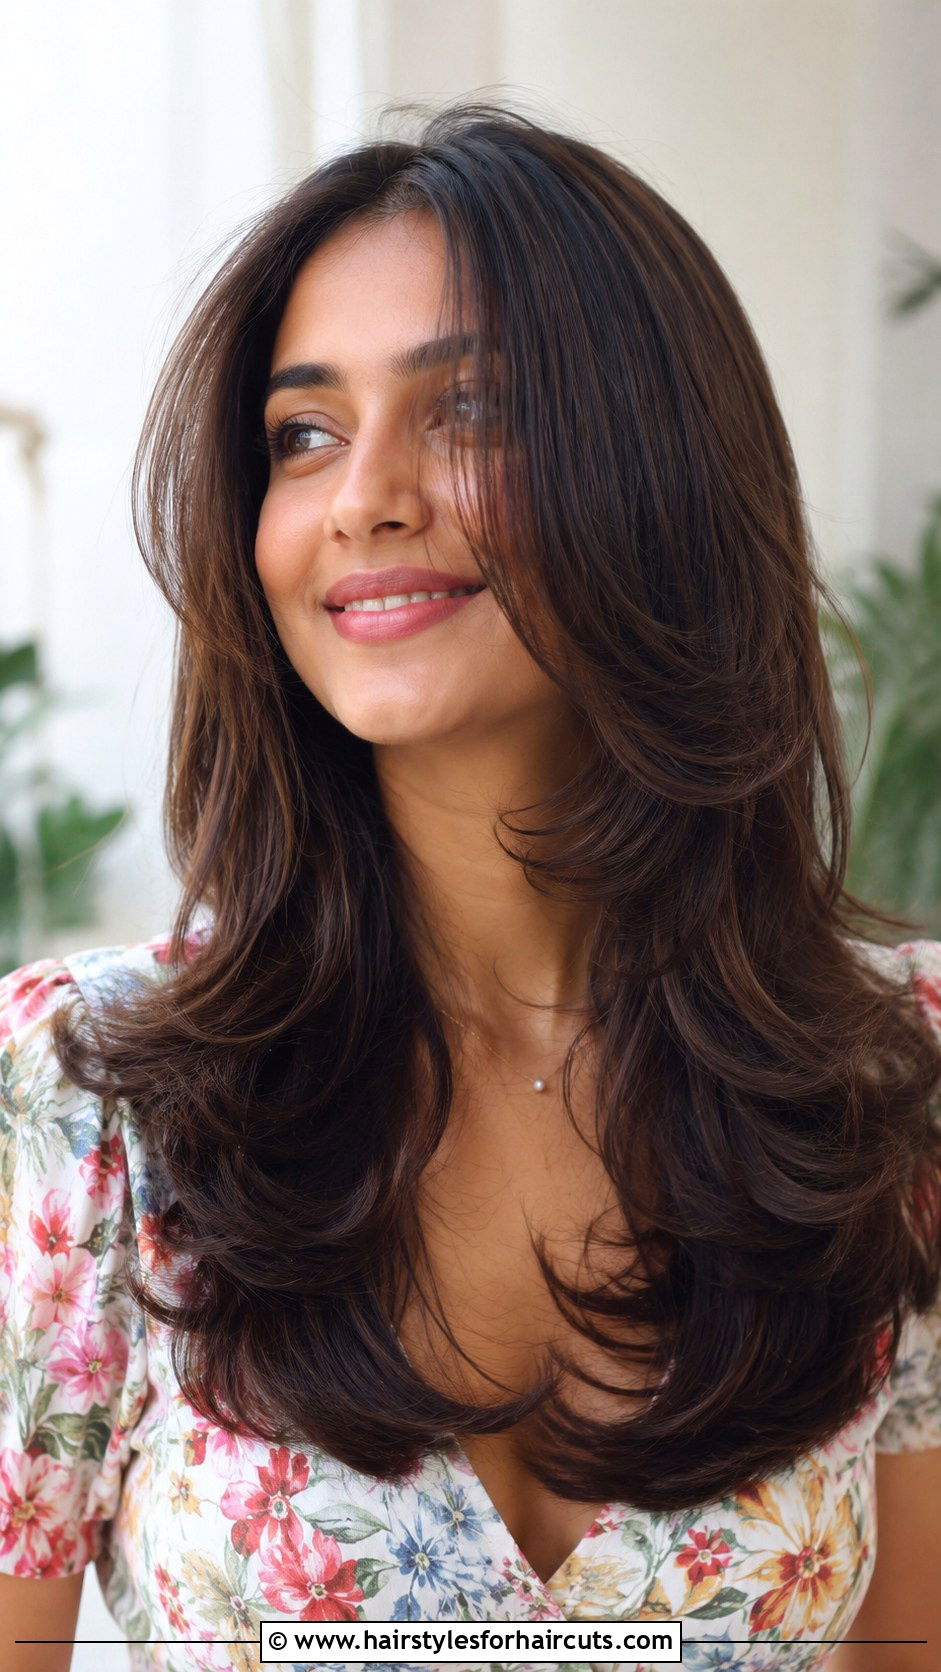
Want that magical blend of short face-framing layers with long bouncy ends? The butterfly haircut gives you the best of both worlds, creating volume at the top while keeping the length intact. Begin by parting your hair and isolating a halo section on top. Pull the bottom layer straight down and trim it to your desired baseline length. For the top halo section, pull the hair up at a ninety-degree angle and cut to create short, sweeping layers. This technique creates a beautiful fluttery effect that mimics butterfly wings. It adds incredible movement and dimension to long hair, making it look fuller and more vibrant without losing your precious length.
5. Wolf Cut Haircut Tutorial

Channel your inner rockstar with a style that is currently taking the internet by storm. The wolf cut features heavy, choppy layers on top that seamlessly blend into shaggier, textured ends. To create this look, pull all your hair up into a high ponytail at the front and cut straight across. Then, take another ponytail at the back and do the same. Let your hair down and refine the layers using deep point cutting. This creates a wild, lived-in vibe with incredible volume at the crown. It works exceptionally well on wavy and thick hair, giving you that effortlessly cool, textured appearance that requires minimal styling effort.
6. Shag Haircut Tutorial

Do you crave a look that is full of texture, movement, and retro charm? The shag haircut is a classic option that relies on heavily layered ends and a choppy finish throughout. Start by cutting your perimeter to your desired length, whether short or long. Create layers by pulling sections up to a stationary guide at the top of the head. This stacks the weight and creates the signature shaggy volume. Use a razor or thinning shears on the ends to add that piecey, feathered texture. The shag is incredibly forgiving and looks amazing with natural air drying, giving you a relaxed, tousled style that is full of personality.
7. Inverted Bob Haircut Tutorial

Looking for a sleek style that offers a dramatic angle from front to back? The inverted bob features a shorter back that gradually lengthens toward the front, framing your face perfectly. Start at the back center, establishing your shortest length at the nape. As you work your way up and around the sides, angle your fingers downward, leaving the front sections longer. Use a slight tension to ensure the angle is smooth and continuous. This technique creates a beautiful stacked effect at the back, adding serious volume to the nape area. It is a highly flattering choice for most face shapes and gives a polished, modern edge to your overall look.
8. French Bob Haircut Tutorial

Craving a look that effortlessly blends vintage romance with modern chic? The French bob is a chin-grazing cut that pairs perfectly with a soft, wispy texture. Begin by parting damp hair down the middle. Cut the back section bluntly just below the chin, following the jawline. Work your way to the front, ensuring the sides gently curve toward the face. To achieve that effortless Parisian feel, use point cutting on the ends rather than a blunt snip. This keeps the line soft and bouncy rather than severe. The French bob works wonders for straight and fine hair, providing a stunning shape that looks incredibly stylish and refreshingly low maintenance.
9. Asymmetrical Bob Haircut Tutorial
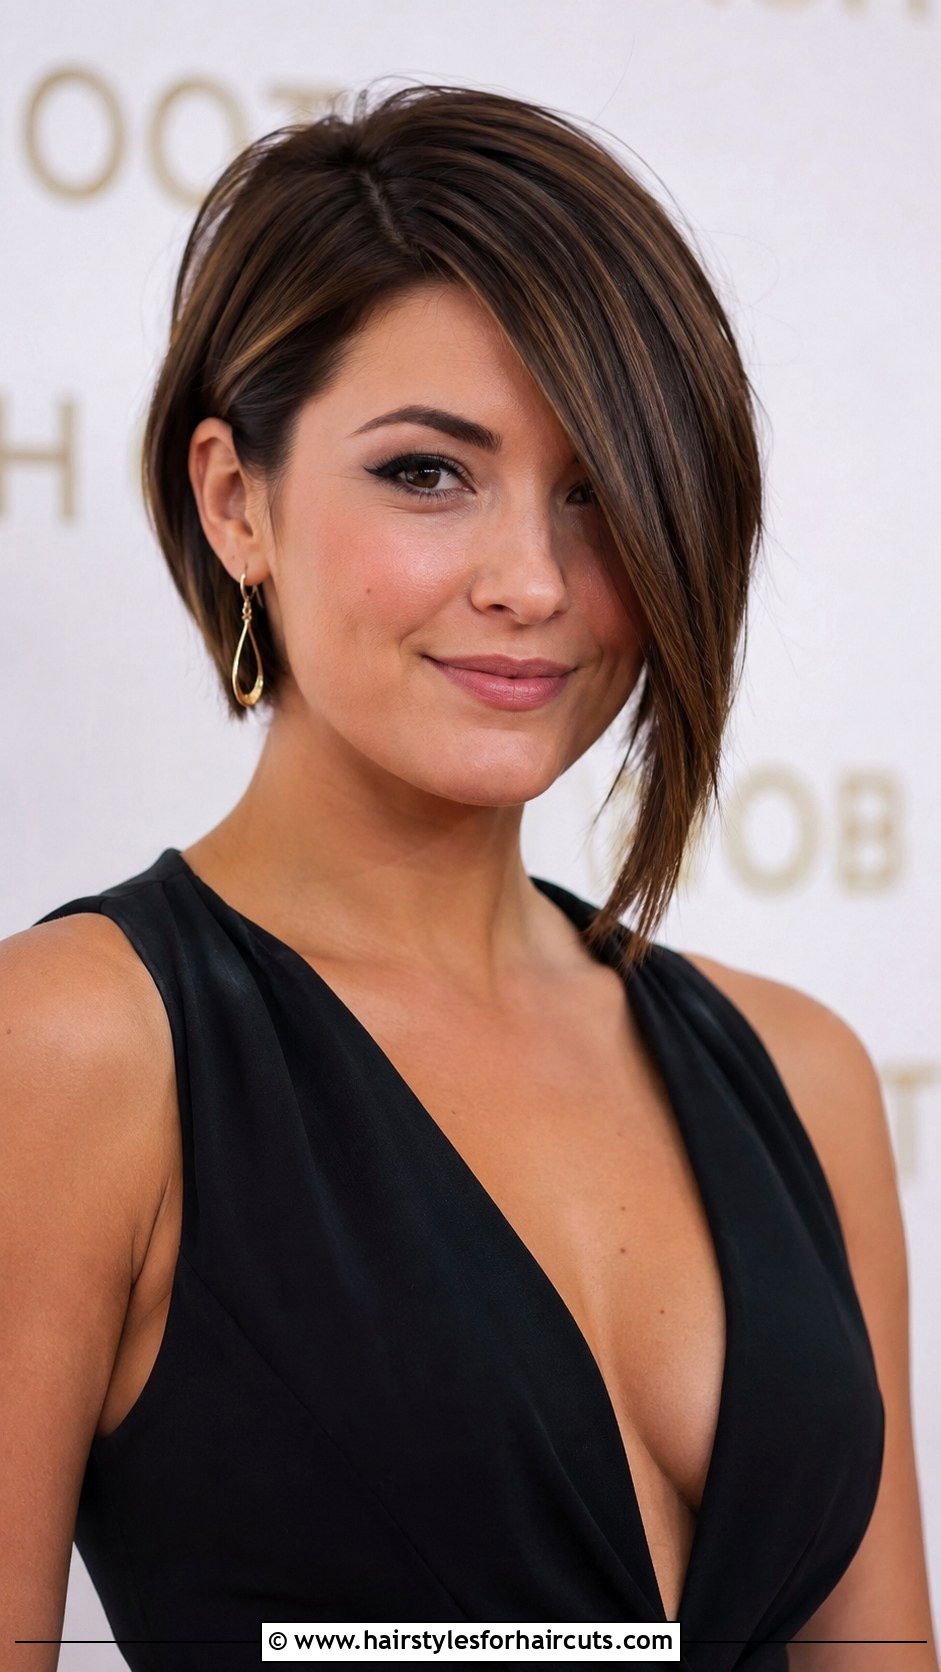
Want to make a bold statement that defies traditional symmetry? The asymmetrical bob features one side longer than the other, offering an edgy and artistic vibe. Start by establishing the length on the shorter side, usually around the ear or jawline. As you work horizontally across the back, gradually increase the length until you reach the longer side, which can fall just above the collarbone. Keep the layers minimal to maintain the striking diagonal line. This architectural cut is highly customizable and draws immediate attention to your neckline and jaw. It is perfect for anyone wanting a modern, fashion-forward appearance that stands out from the standard uniform cuts.
10. Layered Bob Haircut Tutorial

Are you searching for a way to give your classic bob some extra movement and volume? The layered bob combines the timeless structure of a bob with the bounce of strategically placed layers. First, establish your baseline length by cutting the perimeter bluntly. Next, take down sections from the crown and elevate them before cutting to create your layers. Blend these layers seamlessly into the baseline using point cutting. This ensures the ends remain soft and manageable rather than bulky. The layered bob is incredibly versatile and works beautifully on thick hair by removing excess weight. You get a lively, dynamic shape that holds its style effortlessly all day long.
11. Short Layered Haircut Tutorial

Need a cut that delivers maximum volume and texture without the long length? The short layered haircut is a fantastic way to create a bouncy, lively style. Begin by cutting the perimeter to your desired length around the ears and neck. Then, establish a guide layer at the crown and work your way down, pulling sections up to meet the guide. This creates a heavily stacked, layered effect that packs a lot of body at the top. Use thinning shears on the ends to remove bulk and add a piecey texture. It is a remarkable option for fine hair, giving the illusion of thick, dense locks that are easy to style.
12. Long Blunt Haircut Tutorial
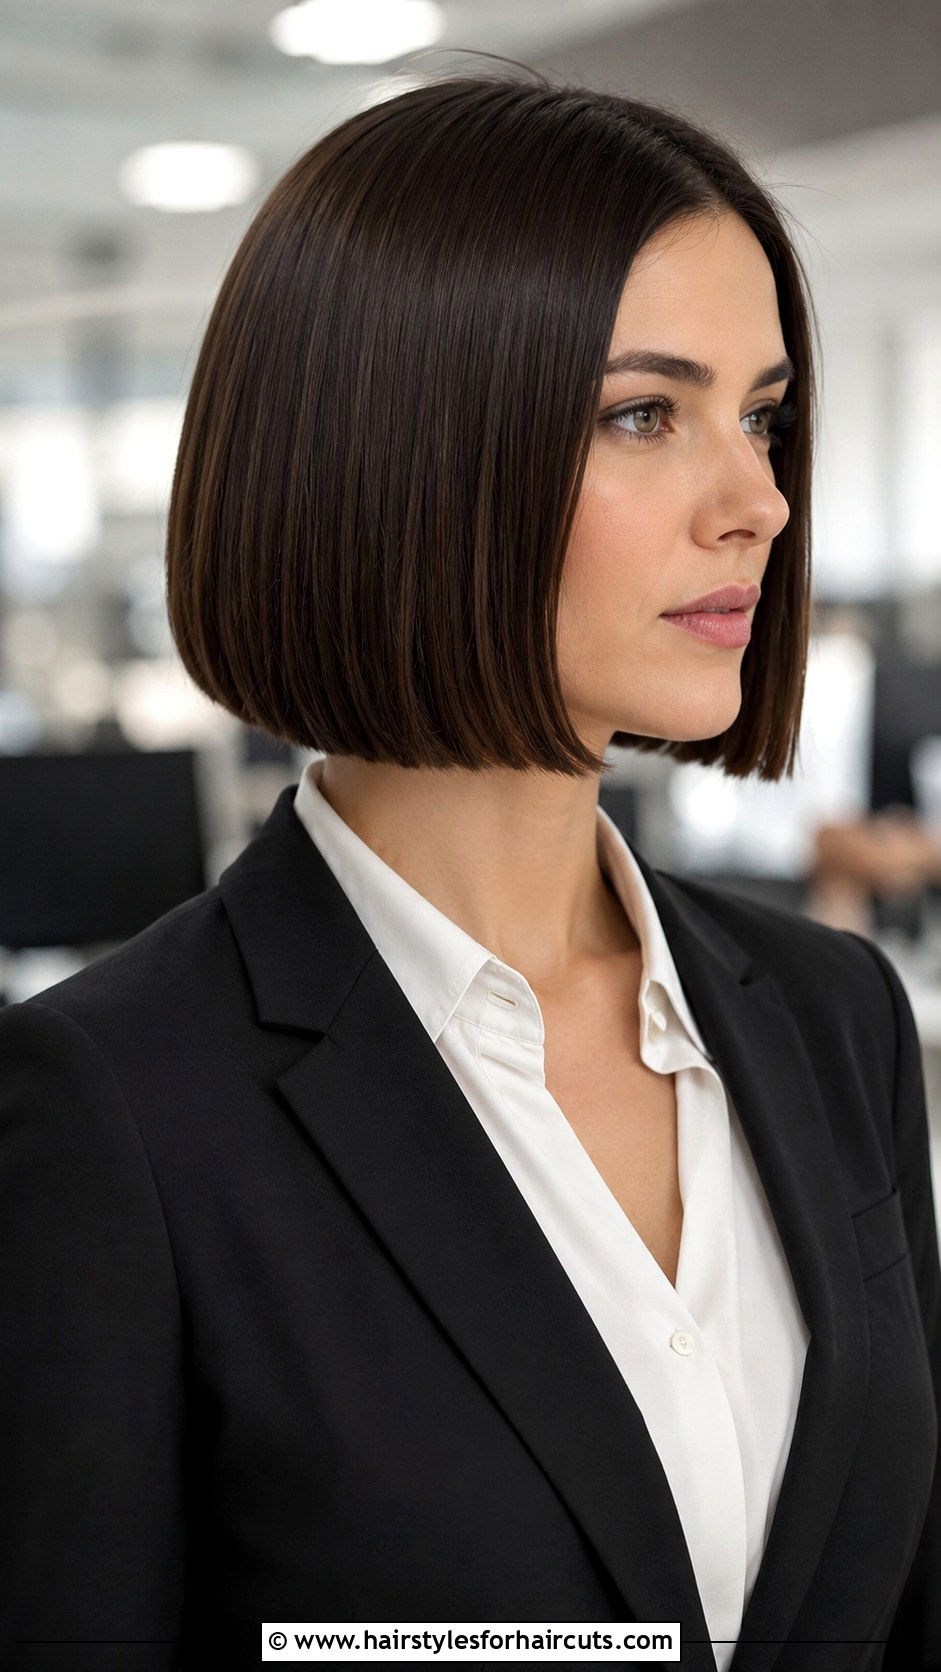
Who says long hair cannot look sharp and meticulously groomed? The long blunt haircut is all about one solid, pristine line that showcases the density of your hair. Have your hair damp and combed straight down. Section off the top layers and clip them away. Starting at the nape, cut a perfectly straight horizontal line using the comb as your guide. Continue working up the back, bringing down small sections and cutting them to match the baseline exactly. Avoid any texturizing or layering to keep the edge crisp. This cut is the ultimate choice for anyone wanting to emphasize their hair thickness and achieve a sleek, polished finish every time.
13. Curly Shag Haircut Tutorial

Ready to embrace your natural curls with a shape that celebrates their bounce? The curly shag is specifically tailored to enhance natural curl patterns while removing unwanted bulk. Always cut curly hair when it is dry to see exactly how the curls fall. Establish your perimeter length, then take small sections and cut each curl individually at an angle to create movement. Layer the top heavily to encourage the curls to spring up and frame the face. Use the feathering technique on the ends to keep the shape light and bouncy. This gives you a fun, dynamic look that highlights your natural texture without the dreaded triangle shape.
14. Buzz Cut Haircut Tutorial

Looking for the ultimate low-maintenance, high-impact style that exudes confidence? The buzz cut is a bold, liberating choice that requires minimal upkeep. Start by deciding on your desired length, which will determine the clipper guard you use. Begin at the front hairline and move the clippers straight back over the top of the head. Work from the sides up to the temples, and then tackle the back. Always move against the direction of hair growth for an even cut. For a faded look, gradually decrease the guard size as you move toward the nape and sides. It is a remarkably empowering cut that showcases your facial features with absolute clarity.
15. Undercut Haircut Tutorial

Want to keep your length on top while ditching the bulk underneath? The undercut offers a striking contrast between long hair on top and shaved sides. Separate the top section from the bottom by creating a clean parting around the parietal ridge. Clip the top section away securely. Using clippers, start from the nape and shave the bottom sections, moving against the hair growth. You can go completely skin-tight or leave a little length depending on your preference. Blend the transition slightly if desired. This edgy cut keeps you cool and drastically reduces styling time, giving you a rebellious and modern aesthetic that stands out wherever you go.
16. Medium Layered Haircut Tutorial
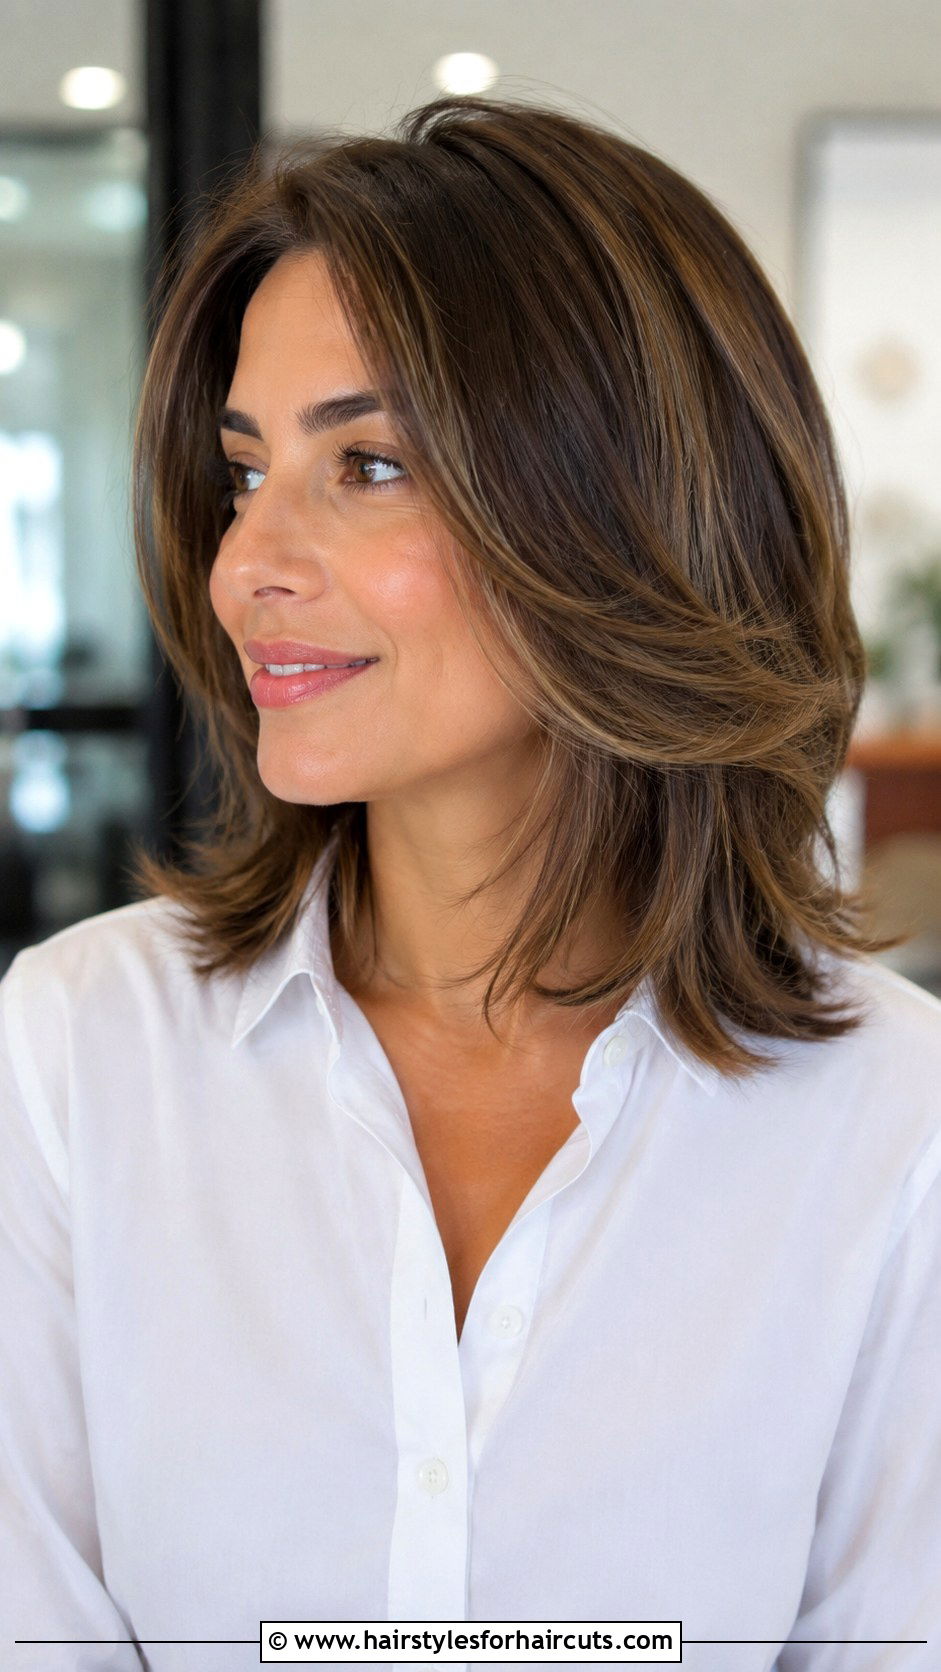
Do you desire a versatile length that offers both styling options and manageable weight? The medium layered haircut hits right around the shoulders, providing the perfect balance. Start by establishing the baseline length at the shoulders. Create a guide layer at the crown and pull subsequent sections up to this guide, cutting off the excess. This creates beautiful, cascading layers that add volume and movement to the mid-lengths. Point cut the ends to ensure the layers blend smoothly without any harsh lines. This style is incredibly adaptable, looking fantastic whether you wear it straight, wavy, or curly. It brings life and dimension to your everyday look with minimal effort.
17. Micro Bang Pixie Haircut Tutorial

Want to add a quirky, high-fashion element to your short hair? The micro bang pixie haircut combines the boldness of a pixie with the striking look of ultra-short bangs. Cut the sides and back short, tapering them closely to the head. Leave the top section longer to create volume and texture. For the bangs, take a small section at the front hairline and cut it straight across high on the forehead, well above the eyebrows. Use point cutting to soften the edges slightly while keeping the line distinct. This creates a dramatic frame for your eyes and forehead, offering an unforgettable, avant-garde style that radiates confidence and creativity.
18. Face Framing Layered Haircut Tutorial

Looking for a subtle way to highlight your best features without losing your overall length? The face framing layered haircut focuses the layers exclusively around the front. Keep the back length blunt and solid. Take front sections and pull them forward, cutting them at an angle that slopes from shorter around the cheekbones to longer at the collarbone. This technique creates a beautiful curtain effect that draws attention to your eyes and jawline. It is a fantastic option for anyone wanting to update their look subtly. The framing layers blend seamlessly into the longer back sections, giving you a bright, lifted appearance without a full, heavy layered cut.
19. Texturized Bob Haircut Tutorial

Are you tired of rigid lines and wanting something more relaxed? The texturized bob takes the classic bob shape and gives it a piecey, lived-in finish. Start by cutting your basic bob silhouette to your desired length. Once the shape is established, go back through the ends using a razor or texturizing shears. Make small, angled snips into the ends to remove weight and create movement. Avoid cutting straight across to maintain that soft, feathery edge. This approach prevents the bob from looking bulky or helmet-like. The result is a beautifully airy, tousled style that moves naturally and looks effortlessly chic, even on days when you just wake up and go.
20. A Line Bob Haircut Tutorial

Seeking a geometric style that offers a sleek, uniform angle? The A line bob is slightly shorter in the back and gradually gets longer toward the front, with no stacked layers. Comb your damp hair straight down. Cut the back baseline at the nape to your preferred shortest length. As you work toward the front, pivot your sections slightly, allowing the hair to fall longer toward the chin. Ensure the sides are completely blended into the back angle. This creates a clean, sharp line that frames the neck and jaw beautifully. It is a universally flattering cut that projects a highly polished, professional vibe that never goes out of style.
21. Mullet Haircut Tutorial

Dare to rock a style that is unapologetically bold and steeped in retro cool? The mullet haircut is defined by its short top and sides contrasted with a significantly longer back. Cut the top and sides using a tapering technique, keeping them tight and textured. Leave the back section long, usually hitting below the shoulders. The key to a modern mullet is the seamless transition between the short and long sections. Use point cutting to blend the sides into the back, creating a shaggy, disconnected effect. This audacious cut brings a rebellious energy to your look, offering an edgy, statement-making style that is surprisingly easy to wear daily.
22. Long Curly Haircut Tutorial

Want to maintain your gorgeous length while keeping your curls perfectly shaped? The long curly haircut requires a delicate touch to avoid the dreaded pyramid effect. Always trim curls while dry so you can see their natural fall. Start by trimming the perimeter to your desired length, remembering that curls will bounce up significantly once cut. Take small sections and snip the ends individually, cutting at an angle to encourage the curl to clump together beautifully. Avoid thinning shears, as they can disrupt the natural curl pattern. This method ensures your long curls fall gracefully, maintaining their natural volume and bounce while looking incredibly healthy and well-defined every day.
23. Short Bob Haircut Tutorial

Looking for a quick and classic style that sits above the jawline? The short bob is a timeless, elegant choice that highlights the neck and facial structure. Part your damp hair down the middle and clip up the top sections. Starting at the nape, cut a clean, horizontal baseline just below the ears. Work your way around the head, maintaining a slight tension and ensuring the sides match the back length. Keep the cut all one length for a sleek finish. This length is perfect for highlighting cheekbones and works wonderfully on straight or slightly wavy hair. It delivers a neat, sophisticated appearance that is always effortlessly stylish and professional.
24. Layered Shag Haircut Tutorial

Want a cut that oozes rock-and-roll vibes with lots of movement? The layered shag combines heavy layering with a choppy, textured perimeter. Begin by cutting the front sections to your desired face-framing length, usually around the cheekbones. Pull all other sections up to this front guide and cut, creating heavy layers throughout the top and mid-lengths. Leave the back slightly longer but still heavily textured. Use a razor on the ends to maximize that shaggy, piecey look. This creates an incredible amount of volume at the crown and a cool, messy finish. It is the ultimate low-maintenance cut for anyone wanting a stylish, effortlessly tousled appearance every single day.
25. Shoulder Length Blunt Haircut Tutorial
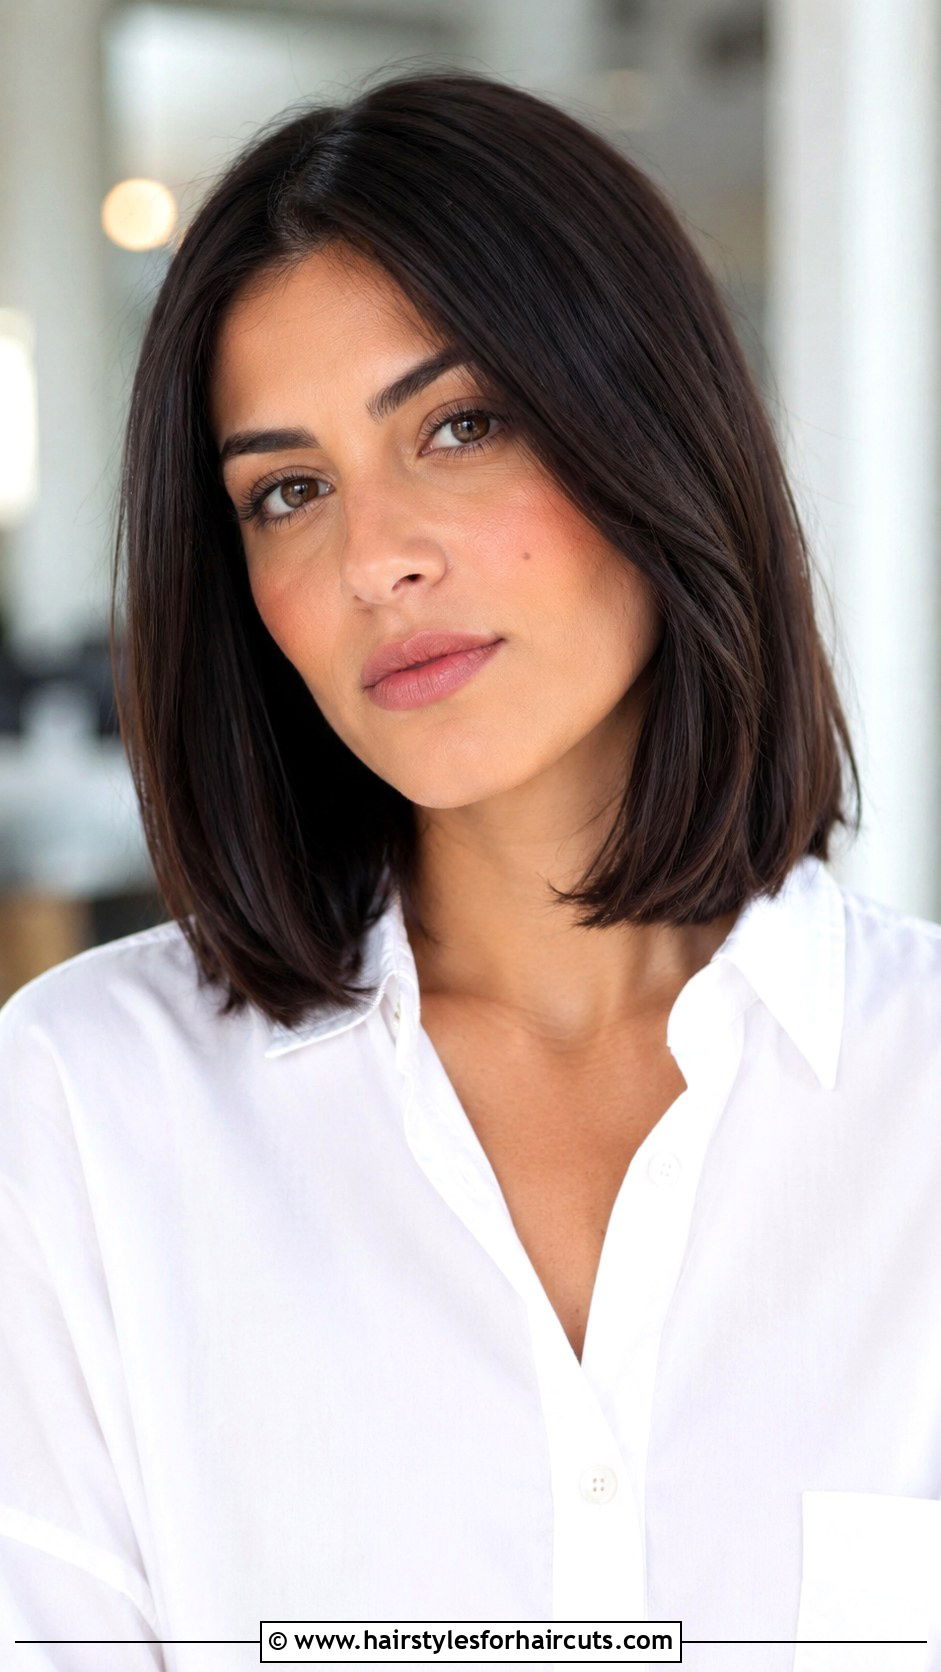
Searching for a universally flattering length that looks incredibly healthy and thick? The shoulder length blunt haircut hits right at the collarbone, offering maximum versatility. Comb your damp hair straight down and part it in the middle. Section off the top layers. Starting at the nape, cut a perfectly straight horizontal baseline right at the shoulders. Continue bringing down small sections and cutting them to this exact baseline without any elevation. This technique preserves the density of the hair, making the ends look remarkably full and healthy. It is a fantastic everyday style that looks beautiful worn down, tucked behind the ears, or thrown into a quick, chic ponytail.
Conclusion:
Mastering your own hair at home can seem intimidating at first, but with the right guidance, it becomes a rewarding experience. Throughout this 25 haircuts tutorial, we have explored a vast array of styles ranging from bold pixies and chic bobs to heavily layered shags and sleek blunt cuts. Remember to always start with sharp shears, work with clean and damp hair unless dealing with curls, and make small, conservative snips. You can always take more off, but you cannot put it back. Taking the time to understand your unique hair texture and face shape will help you choose the best look. With patience and practice, you can achieve stunning, salon-quality results right in your own bathroom.

Leave a Reply